


As an avid iPhone user, I have always been fascinated by the capabilities of its camera. With every new model, Apple never fails to improve the camera features, giving us the ability to capture stunning photos and videos. Over the years, I have discovered some incredible tricks and techniques that have taken my iPhone photography to the next level. In this article, I will share with you some of the best iPhone camera tricks that I have learned, so you too can capture professional-looking photos with just your iPhone.
1. Use the Grid Feature
One of the simplest yet most effective iPhone camera tricks is to enable the grid feature in the camera settings. This feature overlays a grid on your camera screen, dividing it into nine equal parts. By following the rule of thirds and aligning your subjects along the grid lines or at the intersections, you can create visually pleasing and well-composed shots. This technique helps you avoid placing your subject dead center, resulting in more interesting and balanced compositions.
2. Lock Focus and Exposure

When taking photos with the iPhone camera, it’s essential to have proper focus and exposure. To achieve this, simply tap and hold on the area of the screen where you want to focus. A yellow box will appear, indicating that the focus is locked. Additionally, you can adjust the exposure by sliding your finger up or down on the screen. This technique is particularly useful in tricky lighting situations, ensuring that your subject is sharp and well-exposed.
3. Experiment with Portrait Mode
If you own an iPhone with dual camera capabilities, such as the iPhone 11 Pro or iPhone 12 Pro, don’t miss out on the incredible Portrait Mode feature. This feature allows you to create stunning depth-of-field effects, blurring the background and making your subject stand out. Experiment with different lighting conditions and distances to achieve the desired effect. Portrait Mode is perfect for capturing professional-looking portraits or highlighting specific details in a scene.
Mastering Portrait Mode: How to Take Stunning Photos with Your iPhone Camera
In the world of photography, portrait mode has become a game-changer. With the advancements in smartphone cameras, specifically on the iPhone, capturing professional-looking portraits has never been easier. As an avid iPhone photographer, I have discovered some tricks that can help anyone master portrait mode and take stunning photos.
1. Choose the Right Lighting: Lighting plays a crucial role in photography, and portrait mode is no exception. To capture stunning portraits, it’s important to choose the right lighting conditions. Natural light is usually the best option, as it provides a soft and flattering illumination. Avoid harsh overhead lighting or direct sunlight, as it can cast unflattering shadows. Experiment with different lighting setups and find what works best for your subject.
2. Utilize Composition Techniques: Composition is another aspect that can make your portrait photos stand out. One effective technique is the rule of thirds, where you divide the frame into a 3×3 grid and place your subject off-center at one of the intersecting points. This creates a more visually appealing composition. Additionally, try different angles and perspectives to add interest and depth to your photos.
3. Create Depth with Backgrounds: One of the benefits of portrait mode is the ability to create a shallow depth of field, where the subject is in sharp focus while the background is blurred. This effect can add depth and make the subject stand out. When using portrait mode, consider using backgrounds with contrasting colors or textures to enhance the overall composition and create a visually appealing image.
4. Use the Portrait Lighting Effects: The iPhone’s portrait mode comes with built-in lighting effects that can dramatically enhance your portraits. Experiment with the different modes like Natural Light, Studio Light, Contour Light, Stage Light, and Stage Light Mono. Each mode creates a unique lighting effect and can help you achieve a specific mood or style in your portrait photos.
5. Edit and Enhance: While portrait mode does a great job of capturing stunning photos, don’t be afraid to edit and enhance your images further. The iPhone’s built-in editing tools, such as adjusting brightness, contrast, and color balance, can take your portraits to the next level. Additionally, there are plenty of third-party editing apps available that offer advanced features and filters to further enhance your portrait photos.
By mastering portrait mode and utilizing these tips, anyone can take stunning photos with their iPhone camera. Remember to experiment, be creative, and always keep learning. Happy shooting!
Understanding the Depth Effect and How to Use It Effectively
As an avid iPhone photographer, I have always been fascinated by the depth effect feature on my iPhone camera. This feature allows you to capture stunning photos with a shallow depth of field, blurring the background to create a sense of depth and emphasis on the subject. Understanding how to use this effect effectively can greatly enhance your photography skills and take your iPhone camera to the next level.
1. Adjusting the Depth Effect: One of the key aspects of using the depth effect feature is understanding how to adjust it effectively. When you open the camera app on your iPhone, you will see the “Portrait” mode option. Tap on this mode and position your subject within the frame. As you do this, pay attention to the yellow label that appears, indicating the level of depth being applied. You can also use the slider to adjust the amount of background blur, giving you more control over the final result.
2. Choosing the Right Subjects: To make the most of the depth effect, it is important to choose the right subjects. While this feature works well with people and animals, it can also be used to highlight objects or landscapes. Experiment with different subjects to see what works best for you and your style of photography. Keep in mind that subjects with distinct foreground and background elements tend to produce the best results, as these create a greater sense of depth.
- Composition: Paying attention to composition is crucial when using the depth effect. Think about how you can frame your subject to create a visually pleasing image. Experiment with different angles and perspectives to add more interest to your photos.
- Lighting: Good lighting is essential for capturing stunning photos with the depth effect. Natural light works best, so try to shoot in well-lit areas or during the golden hour for optimal results. Avoid harsh shadows or bright highlights, as these can detract from the overall effect.
- Editing: After capturing your photo with the depth effect, don’t be afraid to make minor adjustments using editing apps. This can help enhance the overall look of the image and make it more visually appealing.
Understanding the depth effect and knowing how to use it effectively can greatly improve your iPhone photography. By adjusting the depth effect, choosing the right subjects, paying attention to composition and lighting, and making minor edits, you can create stunning photos that stand out from the rest. So go out there, experiment, and have fun capturing beautiful moments with your iPhone!
Exploring the hidden features of your iPhone camera
As an iPhone user, you might be familiar with the basic features of your device’s camera, such as taking photos and videos. However, there are several hidden features that can enhance your photography experience and help you capture even more stunning shots. In this article, I will introduce you to some of these hidden features and show you how to make the most of your iPhone camera.
1. Portrait mode
One of the most powerful features of the iPhone camera is the Portrait mode. This feature allows you to take professional-looking photos with a blurred background, commonly known as the “bokeh” effect. To use this feature, simply open the Camera app, swipe to the Portrait mode, and position your subject within the frame. The iPhone will automatically detect the subject and blur the background, creating a stunning depth-of-field effect.
2. Burst mode
Another hidden gem in the iPhone camera is the Burst mode. Burst mode is perfect for capturing fast-moving subjects or any moment that requires precision and timing. To activate Burst mode, hold down the shutter button or one of the volume buttons while taking a photo. The iPhone will then capture a series of photos in rapid succession. Afterward, you can select the best shot from the burst and delete the rest to free up storage space.
3. Live Photos
If you want to add more life to your photos, you can use the Live Photos feature. Live Photos captures a 1.5-second video clip before and after you take a photo, giving you a “living” image that can be played back with a long press on the photo. This feature is great for capturing dynamic moments, such as a smile or a wave. You can also apply various effects to your Live Photos, such as Loop, Bounce, and Long Exposure, to create unique and eye-catching visuals.
4. Timer
The Timer feature in your iPhone camera can be handy when you want to take a group photo or a self-portrait. It allows you to set a delay before the photo is captured, giving you enough time to position yourself or join the group. To use the Timer, open the Camera app, tap on the timer icon, and select the desired delay time. Once the timer is started, the camera will capture the photo automatically. You can also use the Timer in conjunction with other shooting modes, such as Burst mode or Live Photos, to capture the perfect shot.
5. Gridlines
To improve the composition of your photos and ensure that your subjects are properly aligned, you can turn on the Gridlines feature on your iPhone camera. The Gridlines feature divides the camera screen into a 3×3 grid, making it easier to follow the rule of thirds and create balanced and visually pleasing compositions. To enable the Gridlines, go to the Settings app, tap on the Camera option, and toggle on the Grid switch. The gridlines will then appear on your camera screen, helping you frame your shots more effectively.
These are just a few of the hidden features of your iPhone camera that can take your photography to the next level. Whether you want to capture stunning portraits, dynamic moments, or perfectly composed shots, these features will help you unlock the full potential of your iPhone camera and elevate your photography skills.
Unleashing the power of the grid feature for better composition
When it comes to capturing stunning photos with my iPhone camera, one of the most useful features I’ve discovered is the grid option. This simple tool has allowed me to improve my composition and create more visually appealing images.
The grid feature works by dividing the camera screen into a grid, typically with two horizontal lines and two vertical lines, creating nine equally-sized boxes. By aligning the main elements of my photo with these lines, I am able to create a more balanced and pleasing composition.
Creating balance: The grid feature helps me ensure that the main elements of my photo are aligned with the lines of the grid. For example, when photographing a landscape, I can position the horizon along one of the horizontal lines to create a sense of balance. This prevents the photo from appearing tilted or uneven, resulting in a more visually pleasing image.
Rule of thirds: The grid feature also helps me apply the rule of thirds, a fundamental principle of composition in photography. By placing important elements of my photo along the intersections of the grid lines, I am able to create a sense of balance and visual interest. For example, when capturing a portrait, I can position the subject’s eyes at one of the intersections, creating a captivating composition.
Improving symmetry and alignment: The grid feature is also extremely helpful when photographing symmetrical subjects, such as buildings or patterns. By aligning the lines of the grid with the edges of the subject, I can ensure that the photo is perfectly symmetrical and visually appealing. This tool also helps me adjust the alignment of my photos, preventing any unwanted angles or distortions.
In conclusion, utilizing the grid feature on my iPhone camera has been a game-changer for improving the composition of my photos. Whether I’m capturing landscapes, portraits, or symmetrical subjects, this simple tool helps me create more balanced, visually appealing images. So, next time you’re taking photos with your iPhone, don’t forget to unleash the power of the grid feature to enhance your composition.
Light up your photos: tips on using natural light to enhance your iPhone photography
When it comes to photography, lighting plays a crucial role in capturing beautiful and captivating images. As an iPhone user, you have the advantage of being able to use natural light to enhance your photos and make them stand out. Here are some tips on how to make the most of natural light when taking pictures with your iPhone.

1. Find the best lighting conditions: The key to capturing stunning photos with your iPhone is to find the right lighting conditions. The best time to shoot outdoors is during the golden hour, which is the hour after sunrise or before sunset when the light is soft and warm. Avoid shooting under direct sunlight, as it can create harsh shadows and wash out the colors in your photos.
- Tip: Look for areas with diffused light, such as shade or overcast days, which can create a soft and even lighting effect.
- Tip: Experiment with backlighting, where the light source is behind your subject, to create stunning silhouettes and add depth to your images.
2. Use the exposure lock feature: The exposure lock feature on your iPhone allows you to control the exposure of your photos. To use this feature, simply tap and hold on the area of the screen that you want to focus on and lock the exposure. This allows you to capture well-lit subjects, even in challenging lighting conditions.
3. Utilize natural reflectors: Natural reflectors, such as water, walls, or even a white shirt, can help bounce light back onto your subject and create a more balanced and flattering lighting effect. Look for these reflective surfaces and use them to your advantage to improve the overall lighting in your photos.
4. Avoid using flash: While the flash on the iPhone can be handy in low-light situations, it can often create harsh and unnatural lighting effects. Instead of relying on the flash, try adjusting the exposure settings or using an external light source to get a more natural and pleasing result.
By paying attention to the lighting conditions, utilizing the exposure lock feature, and making use of natural reflectors, you can enhance your iPhone photography and capture stunning images that showcase the beauty of natural light. So, grab your iPhone, head outside, and start exploring the world of natural light photography!
Maximizing the golden hour: capturing magical moments with perfect lighting
As a photography enthusiast, I have discovered that one of the most breathtaking times to capture stunning photos is during the golden hour. This magical time occurs just after sunrise or before sunset when the sunlight is softer, warmer, and creates a beautiful golden glow. To make the most of these moments, I have honed a few key techniques and tricks using my iPhone camera.
1. Location scouting: The first step in maximizing the golden hour is finding the right location. Look for areas with interesting elements such as water bodies, architectural structures, or lush greenery that can enhance the overall composition of your photograph. Experiment with different angles and perspectives to make the most of the soft sunlight.

2. Manual exposure adjustment: The iPhone camera has a fantastic feature that allows you to manually adjust the exposure. During the golden hour, this feature becomes invaluable as it helps to prevent overexposure caused by the intense sunlight. By tapping and holding on the screen, you can adjust the exposure level and ensure that your photos capture the delicate nuances of the golden hour.
3. Utilizing HDR mode: High Dynamic Range (HDR) mode is another great tool to utilize during the golden hour. HDR mode helps to capture a broader range of light and dark tones, resulting in a more balanced and detailed photograph. When shooting in HDR mode, the iPhone takes multiple photos at different exposure levels and blends them together to create a stunning final image.
4. Incorporating silhouettes: One of the most captivating ways to capture the golden hour is by incorporating silhouettes. Use the soft, warm light as a backdrop to create striking silhouettes of objects, people, or even animals. Experiment with different compositions and subject placements to create visually compelling photos that evoke a sense of mystery and wonder.
5. Enhancing colors with editing tools: After capturing photos during the golden hour, take advantage of editing tools available on the iPhone to enhance the colors and overall appeal of the image. Adjust the saturation and warmth of the photo to bring out the golden tones even further. Additionally, consider applying filters or making selective adjustments to highlight specific elements within the photograph.
Capturing magical moments during the golden hour with perfect lighting is an incredibly rewarding experience. By utilizing these tricks and techniques, you can elevate your iPhone photography to new heights and create mesmerizing images that showcase the beauty of this enchanting time of day.
Get that perfect shot: 5 essential iPhone camera settings every photographer needs to know
As an avid photographer, I have found the iPhone camera to be a valuable tool for capturing stunning images on the go. However, to truly make the most out of your iPhone camera, it’s important to familiarize yourself with its essential settings. Here are five key settings that every photographer should know to achieve that perfect shot:
1. Adjust exposure and focus manually
One of the most important settings to master is the ability to manually adjust the exposure and focus of your iPhone camera. By tapping on the screen, you can set the focus point and adjust the exposure level to ensure that the subject is perfectly in focus and well-lit. This feature is particularly useful for capturing portraits or objects with varying levels of brightness.
2. Use HDR mode for better dynamic range
High Dynamic Range (HDR) mode can greatly enhance the quality of your images by balancing the exposure in areas with both bright and dark elements. When enabled, the iPhone will capture multiple images at different exposure levels and combine them to create a final image with improved dynamic range. This is especially helpful when photographing landscapes or scenes with challenging lighting conditions.
3. Utilize Live Photos for capturing moments
Live Photos allow you to capture a short video snippet along with your photo, adding an extra element of life to your images. This feature is perfect for capturing moving subjects, such as pets or children, as it allows you to easily relive the moment by pressing and holding the photo. Additionally, you can select a different frame from the video as the static image if the original shot isn’t perfect.
4. Experiment with different shooting modes
The iPhone camera offers a variety of shooting modes that can help you achieve different effects. For instance, the Portrait mode uses depth mapping technology to create professional-looking images with a blurred background, simulating the bokeh effect typically achieved with a DSLR camera. Likewise, the Panorama mode allows you to capture wide-angle shots by panning your phone across the scene.
5. Edit and enhance your photos using built-in tools
Don’t forget to take advantage of the built-in editing tools that come with the iPhone camera. These tools allow you to make adjustments to your photos, such as cropping, straightening, or applying filters, all within the native Photos app. Additionally, you can download third-party photo-editing apps to further enhance your images with advanced features like selective adjustments and creative filters.
By familiarizing yourself with these essential iPhone camera settings, you’ll be well-equipped to capture incredible photos with your device. So go ahead and start experimenting with these settings to take your photography skills to the next level!
Adjusting exposure, focus, and white balance for optimal results
When taking photos with your iPhone, it is important to adjust the exposure, focus, and white balance to ensure that you capture the best possible image. These settings can greatly impact the overall quality of your photos, and understanding how to make adjustments can help you achieve optimal results.
Exposure
The exposure of a photo refers to the amount of light that enters the camera sensor. To adjust the exposure on your iPhone, simply tap on the area of the screen where you want to set the exposure. A yellow square will appear, and you can slide your finger up or down to adjust the brightness of the image. This is particularly useful when capturing photos in low-light conditions or when there is a significant contrast between light and dark areas in the scene.
Focus
Ensuring that your subject is in focus is essential for capturing sharp and detailed photos. On the iPhone, you can easily adjust the focus by tapping on the area of the screen where you want the camera to focus. Once you tap, a yellow square will appear, indicating that the focus has been set. This allows you to prioritize specific objects or people in your frame, resulting in a clear and well-defined image.
White Balance
The white balance of a photo refers to the color temperature of the image. Setting the correct white balance is crucial for achieving accurate and natural colors in your photos. On the iPhone, you can adjust the white balance by tapping on the area of the screen that contains a neutral gray or white object. This will ensure that the camera reads the correct color temperature and adjusts accordingly, resulting in more realistic and pleasing colors.
Conclusion
By adjusting the exposure, focus, and white balance on your iPhone, you can greatly enhance the quality of your photos. Taking the time to make these adjustments can make a significant difference in the final result, allowing you to capture stunning images that truly showcase your subject. Experiment with these settings to find the right balance for different lighting conditions and subjects, and watch as your iPhone photography skills continue to improve.
Best iphone camera tricks
Torjim Professional Softbox Lighting Kit
Features
| Part Number | TJ003 |
| Warranty | 1 |
| Color | Platinum Set |


Stunning Portraits Around the World
Features
| Is Adult Product | |
| Language | English |
| Number Of Pages | 166 |
| Publication Date | 2023-12-15T00:00:01Z |

DJI Osmo Mobile SE Gimbal Stabilizer
Features
| Part Number | CP.OS.00000214.01 |
| Model | Osmo Mobile SE |
| Warranty | DJI Warranty Applies |
| Color | Gray |
| Release Date | 2023-02-15T00:00:01Z |


| Price history for DJI Osmo Mobile SE Gimbal Stabilizer | |
|---|---|
|
Latest updates:
|
|
NEEWER RGB LED Ring Light
Features
| Part Number | 10103390 |
| Model | 10103390 |
| Warranty | 1 Year Manufacturer |
| Release Date | 2024-08-06T00:00:01Z |


Sixty Tips for iPhone Photography
Features
| Part Number | Illustrations |
| Edition | 1 |
| Language | English |
| Number Of Pages | 144 |
| Publication Date | 2012-08-19T00:00:01Z |
Neewer Curved Light Reflector Diffuser
Features
| Part Number | 10096860 |
| Model | 10096860 |
| Warranty | 1 Year Manufacturer |
| Color | White |
| Release Date | 2024-08-30T00:00:01Z |
| Size | 39.3"x18"/100x45cm |


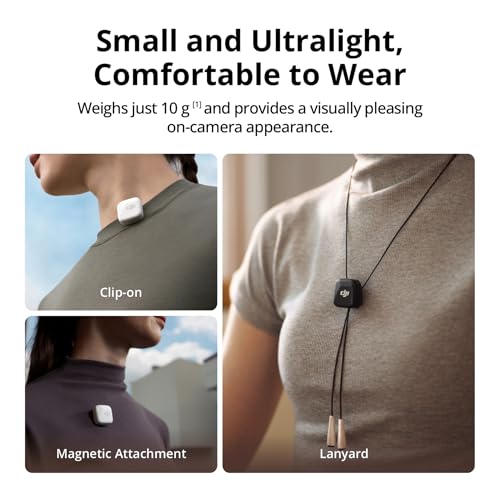
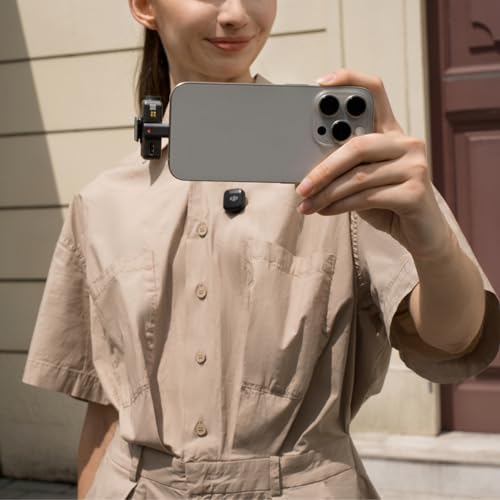
DJI Mic Mini Wireless Lavalier Microphone
Features
| Part Number | 6941565991430 |
| Model | 6941565991430 |
| Warranty | DJI |
| Color | Black |
| Release Date | 2024-11-28T00:00:01Z |


Question and answers:
How can I take better photos with my iPhone camera?
There are several tricks you can try to improve your iPhone photography. First, utilize natural lighting whenever possible and avoid using the flash. Second, tap on the subject you want to focus on before taking the photo to ensure it is in clear focus. Third, utilize the grid feature to assist in composing your shots. Finally, experiment with different camera modes and settings, such as HDR or Portrait mode, to enhance your photos.
How can I take professional-looking photos with my iPhone camera?
To take professional-looking photos with your iPhone camera, consider using third-party camera apps that offer manual controls and advanced features. Additionally, use a tripod or steady your hand to eliminate camera shake. Experiment with different angles and perspectives to add interest to your photos. Lastly, post-process your photos using editing apps to fine-tune the lighting, color, and composition.
What is the best way to capture moving subjects with my iPhone camera?
When capturing moving subjects with your iPhone camera, use burst mode by holding down the shutter button to take a rapid series of photos. This increases your chances of getting a clear shot. You can later select the best photo from the burst. Additionally, enable the Live Photos feature to capture a short video clip along with your photo, which can bring the moving subject to life.
How can I take better selfies with my iPhone camera?
To take better selfies with your iPhone camera, start by finding good lighting to avoid unflattering shadows. Experiment with different angles by holding the camera slightly above or to the side of your face. Use the timer or a selfie stick to get a more natural pose and avoid camera shake. Lastly, consider using portrait mode or the front-facing flash feature for more professional-looking selfies.


