
 Carmen J. Moore

Sony mirrorless cameras are known for their high-quality images and advanced technology. However, over time, dust and dirt can accumulate on the camera sensor, resulting in spots and blemishes on your photos. Cleaning your Sony mirrorless camera sensor is an essential maintenance task that can help ensure your camera continues to perform at its best.


Before you begin cleaning your camera sensor, it’s important to understand the risks involved. If you’re not comfortable cleaning the sensor yourself, it’s best to have a professional do it for you. However, if you’re confident in your abilities, following the right steps can help you safely and effectively clean your Sony mirrorless camera sensor.
In this article, we’ll provide you with a step-by-step guide on how to clean your Sony mirrorless camera sensor. We’ll cover the tools you’ll need, the precautions you should take, and the best practices for safely removing dust and dirt from your camera sensor. By following these tips, you can keep your Sony mirrorless camera in top condition and ensure that your photos are free from unwanted spots and blemishes.
Step-by-step Guide to Cleaning a Sony Mirrorless Sensor Camera
Keeping your Sony mirrorless sensor camera clean is essential for maintaining the quality of your photos and videos. Here is a step-by-step guide to help you clean your camera’s sensor:
Materials Needed:
- Clean, dry microfiber cloth
- Rubber air blower
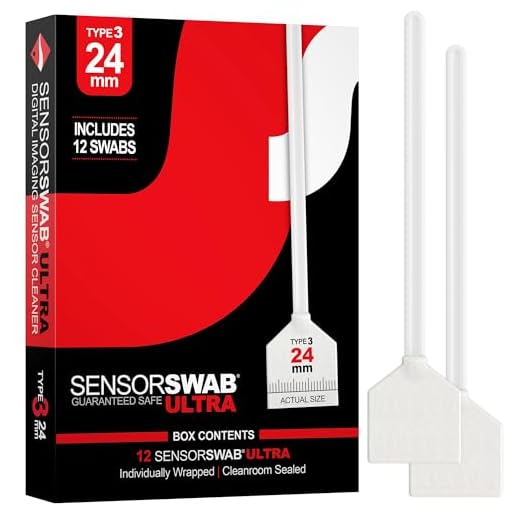
- Sensor cleaning swabs
- Sensor cleaning solution
Step 1: Prepare Your Workspace
Find a clean and well-lit area to work on cleaning your camera. Make sure to turn off your camera and remove the lens before starting the cleaning process.
Step 2: Use the Air Blower
Gently use the rubber air blower to blow away any loose dust or debris on the sensor. Be careful not to touch the sensor with the blower tip.
Step 3: Use Sensor Cleaning Swabs
Apply a small amount of sensor cleaning solution to a sensor cleaning swab. Gently swipe the swab across the sensor in one direction. Avoid pressing too hard to prevent any damage.
Step 4: Final Check
After cleaning the sensor, reattach the lens and turn on the camera. Take a test shot to check if there are any remaining spots or dust particles on the sensor. If needed, repeat the cleaning process.
| Warning |
|---|
| Handle the sensor with care to avoid causing any damage. If you are unsure about cleaning the sensor yourself, consider taking your camera to a professional for cleaning. |
Gather Necessary Supplies
Before you start cleaning your Sony mirrorless camera sensor, make sure you have all the necessary supplies handy. Here is a list of items you will need:
| 1. Sensor cleaning swabs |
| 2. Sensor cleaning solution |
| 3. Blower or air blaster |
| 4. Lens cleaning cloth |
| 5. Camera manual (for reference) |
Optional Items:
If you want to be extra cautious, you can also consider having the following optional items:
| 1. Sensor loupe or magnifying glass |
| 2. Sensor cleaning gel stick |
Prepare a Clean Workspace
Before you start cleaning your Sony mirrorless camera sensor, it’s essential to set up a clean and organized workspace. Here are some steps to help you prepare:
- Choose a well-lit and dust-free area to work in.
- Gather all the necessary cleaning supplies, such as a blower, sensor cleaning swabs, and a sensor cleaning solution.
- Make sure your hands are clean and dry to avoid transferring any dirt or oils to the sensor.
- Turn off your camera and remove the lens to expose the sensor.
- Have a clean microfiber cloth on hand to wipe down the camera body and other surfaces.
Power Off Your Camera
Before starting the sensor cleaning process, make sure to power off your Sony mirrorless camera. This will prevent any accidental damage to the sensor or other delicate parts of the camera. Turning off the camera will also ensure that the sensor is not exposed to any additional dust or debris while cleaning.
Remove the Lens
Before cleaning the sensor of your Sony mirrorless camera, it is essential to remove the lens to access the sensor properly. Make sure your camera is turned off before proceeding. Follow these steps to safely remove the lens:
- Press the lens release button located on the camera body.
- While holding the release button, rotate the lens counterclockwise until it detaches from the camera body.
- Place the lens in a safe location, away from dust and dirt.
“`html
Use a Blower to Remove Dust
One of the most effective ways to remove dust from your Sony mirrorless sensor camera is to use a blower. A blower is a simple tool that blows a stream of air to dislodge dust particles without touching the sensor directly.
Here is how you can use a blower to clean your camera sensor:
Steps:
| 1. | Turn off your camera and remove the lens. |
| 2. | Point the camera downwards to prevent dust from falling back into the sensor chamber. |
| 3. | Gently squeeze the blower to release a stream of air onto the sensor surface. |
| 4. | Repeat the process a few times to ensure all dust particles are removed. |
Using a blower is a safe and effective method for cleaning your Sony mirrorless sensor camera without causing any damage to the sensitive sensor surface.
Use a Sensor Cleaning Kit
If you’re not comfortable cleaning your Sony mirrorless camera sensor manually, consider investing in a sensor cleaning kit. These kits typically include tools like sensor swabs, sensor cleaning fluid, and a blower. Follow the instructions provided with the kit to safely and effectively clean your camera sensor. Make sure to use a kit specifically designed for mirrorless cameras to avoid damaging your sensor.
Before using the sensor cleaning kit, be sure to fully charge your camera battery and remove the lens from your camera. Turn on your camera’s sensor cleaning mode to expose the sensor for cleaning. Use the blower to remove any loose dust particles on the sensor surface.
Next, carefully follow the instructions for using the sensor swab and cleaning fluid to gently remove any stubborn dirt or smudges on the sensor. Be sure to use a new sensor swab for each cleaning session to avoid transferring dirt to the sensor. Take your time and be patient during the cleaning process to avoid causing any damage to your camera sensor.
After cleaning the sensor, turn off your camera and reattach the lens. Perform a test shot to ensure the sensor is clean and free of any spots or marks. If necessary, repeat the cleaning process until the sensor is completely clean.
Gently Swab the Sensor
Once you have removed any visible dust particles from the sensor using a blower, it’s time to gently swab the sensor to remove any remaining dirt or smudges. Make sure to use a sensor cleaning swab that is specifically designed for mirrorless cameras like Sony.
Before swabbing the sensor, ensure that the camera’s battery is fully charged and that the camera is turned off. Remove the lens and carefully follow the manufacturer’s instructions for swabbing the sensor.
Using a clean sensor swab and a few drops of sensor cleaning solution, gently swipe the swab across the sensor in one direction. Avoid applying too much pressure or rubbing the swab back and forth, as this can damage the sensor. Let the sensor air dry for a few minutes before reattaching the lens.
After swabbing the sensor, take a test shot to ensure that the sensor is clean. If there are still visible spots or smudges, repeat the swabbing process until the sensor is free of any dirt or debris.
Check for Remaining Dust Particles
After cleaning the sensor, it’s important to check for any remaining dust particles. To do this, set your camera to a small aperture (such as f/16 or higher) and take a test shot of a white wall or piece of paper. Review the image on your camera’s LCD screen or transfer it to your computer for a closer look.
Zoom in on the image to inspect for any visible dust spots. If you notice any remaining particles, you may need to repeat the sensor cleaning process or consider using a sensor cleaning kit for a more thorough cleaning.
Reattach the Lens
Once you have cleaned the sensor, carefully reattach the lens to your Sony mirrorless camera. Make sure the lens is aligned properly and securely screwed into place to avoid any dust or debris getting inside the camera body.
Remember to turn off your camera before removing or attaching the lens to prevent any damage to the sensor or lens mount.
Power On and Test Your Camera
Before cleaning the sensor of your Sony mirrorless camera, it is important to power on the camera and perform a test to ensure that the sensor needs cleaning. Here’s how you can do it:
| 1. | Turn on your Sony mirrorless camera by pressing the power button. |
| 2. | Set the camera to manual mode or aperture priority mode to keep the sensor exposed. |
| 3. | Point the camera towards a plain, evenly lit surface, such as a white wall or a clear sky. |
| 4. | Take a test shot with a narrow aperture (e.g., f/16) to maximize the visibility of any dust spots on the sensor. |
| 5. | Review the test shot on the camera’s LCD screen or transfer it to a computer for a closer inspection of any visible dust or debris on the sensor. |




Do I really need to use a sensor loupe? I’m not sure if it’s worth the extra cost.
A sensor loupe can help you see dust particles more clearly, making it easier to pinpoint areas needing cleaning. However, it's not strictly necessary if you're careful.
I’ve cleaned my Sony mirrorless sensor a few times using this method. I found that using a blower first really does help get rid of loose dust before swabbing. Just be super careful with the swab; I made the mistake of pressing too hard once and it left some smudges! Now I just do a light swipe and it works well.
It's great to hear about your positive experience! Using a lighter touch with the swab is indeed important to avoid damage.
I disagree with the idea of cleaning your own sensor. It seems risky, and I think it's better to let professionals handle it. I've heard too many stories about people damaging their sensors during DIY cleanings.