Are you looking to enhance the security of your home or office? Installing a surveillance system can provide you with peace of mind and added protection. Floureon 8CH Camera Surveillance Security System is a popular choice for those looking for an affordable and reliable security solution.
In this article, we will guide you through the process of installing the Floureon 8CH camera surveillance security system step by step.
From setting up the cameras to configuring the system, we will cover everything you need to know to get your security system up and running smoothly.
Step-by-step guide for installing Floureon 8ch camera surveillance security
To install the Floureon 8ch camera surveillance security system, follow these steps:
Step 1: Unboxing the system
Start by unboxing the Floureon 8ch camera surveillance security system and checking that all the components are included.
Step 2: Mounting the cameras
Decide on the best locations to mount the cameras for optimal coverage. Use the mounting hardware provided to install the cameras securely.
Note: Ensure the cameras are positioned to cover the desired areas and are securely mounted to prevent tampering.
Step 3: Connecting the system
Connect the cameras to the DVR using the provided cables. Make sure to follow the color-coding on the cables for the correct connections.
Tip: Label the cables and cameras to make troubleshooting easier in the future.
Once the cameras are connected, plug in the power adapter for the DVR and turn on the system.
Follow the on-screen instructions to set up the system and configure the settings to meet your surveillance needs.
Your Floureon 8ch camera surveillance security system is now installed and ready to use for monitoring your property.
Unboxing the Floureon 8ch Camera Surveillance Security System
When you receive your Floureon 8ch camera surveillance security system, the first step is to unbox it carefully to ensure that all the components are intact and undamaged.
Start by removing the outer packaging and opening the box to reveal the contents inside. You should find the DVR unit, cameras, cables, power adapters, mounting brackets, and any other accessories included in the package.
Inspect each item to make sure there are no visible signs of damage. Check the cameras for any cracks or scratches, and ensure that all the cables are in good condition.
Read through the user manual provided to familiarize yourself with the installation process and the different components of the system. This will help you set up your Floureon 8ch camera surveillance security system correctly and efficiently.
Checking the contents of the package
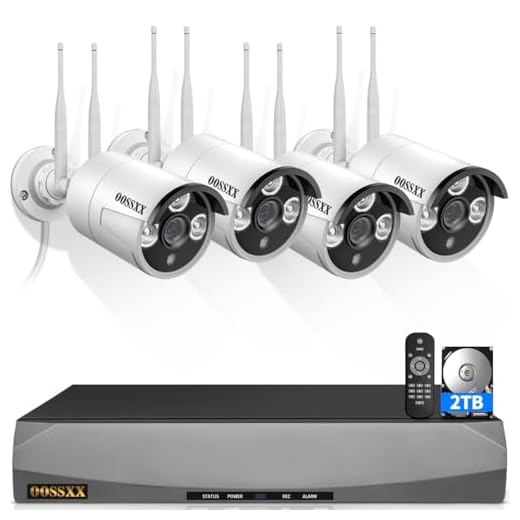
Before starting the installation process, it is important to check the contents of the Floureon 8CH camera surveillance security package to ensure that you have all the necessary components. Here is a list of items that should be included:
- 8CH DVR: The main recording unit that connects to the cameras.
- Cameras: The number of cameras specified in the package, usually 4 or 8.
- Power adapters: Ensure each camera and the DVR has a power adapter.
- Mouse and remote control: Required for operating the DVR.
- Mounting screws and brackets: For securing the cameras in place.
- Ethernet cable: For connecting the DVR to your network.
- HDMI or VGA cable: To connect the DVR to a monitor or TV.
- Quick start guide and manual: For step-by-step instructions on setting up the system.
Ensure that all these components are present in the package before proceeding with the installation to avoid any delays or issues during setup.
Choosing the optimal location for camera placement
When installing your Floureon 8CH camera surveillance security system, it is crucial to choose the optimal locations for camera placement to ensure maximum coverage and security. Here are some factors to consider:
1. Strategic positioning
Place cameras in strategic locations that provide a clear view of all entry points, high-traffic areas, and valuable assets. Consider the layout of your property and identify areas that are vulnerable to break-ins or theft.
2. Avoid obstructions
Avoid placing cameras where they can be easily obstructed by trees, bushes, or other objects. Make sure there are no obstacles that could block the camera’s view and compromise its effectiveness.
Remember: Proper camera placement is essential for maximizing the effectiveness of your surveillance system and enhancing the security of your property.
Mounting the cameras securely
Properly mounting your surveillance cameras is crucial to ensure optimal coverage and security. Follow these steps to securely mount your Floureon 8CH cameras:
- Choose the location for each camera, considering the best vantage points for maximum coverage.
- Use the mounting template provided with the camera to mark the drilling holes accurately.
- Drill the holes using a suitable drill bit and insert wall anchors if needed for added stability.
- Securely attach the mounting bracket to the wall or ceiling using screws, ensuring it is firmly in place.
- Attach the camera to the mounting bracket, making sure it is securely fastened and pointed in the desired direction.
- Adjust the camera angle as needed to optimize the viewing angle and ensure proper coverage of the area.
- Connect the camera to the surveillance system and test the video feed to confirm proper installation and functionality.
By following these steps and ensuring each camera is securely mounted, you can enhance the effectiveness of your surveillance system and improve overall security monitoring.
Connecting the cameras to the DVR system
Once you have positioned your cameras in the desired locations, it’s time to connect them to the DVR system for monitoring and recording. Follow these steps to ensure a successful setup:
- Locate the BNC connectors on the cameras and the DVR system.
- Use the provided BNC cables to connect each camera to the corresponding input on the DVR system.
- Make sure the connections are secure and tight to prevent any signal loss.
- Plug in the power adapters for each camera to ensure they are powered on.
- Turn on the DVR system and follow the on-screen instructions to configure the cameras.
- You may need to adjust the camera settings in the DVR system to match your preferences.
Setting up the DVR system
After connecting the cameras to the DVR, it’s time to set up the system for surveillance and security. Follow these steps to configure the DVR:
- Power on the DVR by plugging it into a power source.
- Connect the DVR to a monitor or TV using the provided HDMI or VGA cable.
- Use the included remote control or front panel buttons to navigate the DVR menu.
- Select the language and set the date and time settings.
- Format the hard drive if it’s a new installation or initialize it if it’s a used one.
- Configure the recording settings, such as resolution, frame rate, and recording schedule.
- Set up motion detection and alarms to receive notifications when activity is detected.
- Connect the DVR to the internet for remote viewing using a smartphone or computer.
Additional tips:
- Make sure to update the DVR firmware to the latest version for enhanced security and functionality.
- Consult the user manual for more detailed instructions on setting up the DVR system.
Configuring the camera settings
Once the floureon 8ch camera surveillance security system is successfully installed, the next step is to configure the camera settings to ensure optimal performance and security. Here are the steps to configure the camera settings:
- Access the camera’s web interface by entering the camera’s IP address in a web browser.
- Log in using the default username and password provided in the camera’s manual.
- Navigate to the settings menu to adjust parameters such as resolution, frame rate, and motion detection sensitivity.
- Set up email notifications for alerts and configure recording schedules for continuous monitoring.
- Enable remote access to view the camera feed from anywhere using a smartphone or computer.
- Ensure the camera firmware is up to date to protect against security vulnerabilities.
By following these steps to configure the camera settings, you can customize the surveillance system according to your preferences and enhance the overall security of your property.
Testing the Camera Surveillance Security System
After successfully installing the Floureon 8CH camera surveillance security system, it is crucial to test its functionality to ensure that all components are working correctly. Here are some steps to follow when testing the system:
- Check the camera connections: Verify that all cameras are properly connected to the DVR and power source.
- Power on the system: Turn on the DVR and monitor to ensure that the system boots up without any issues.
- Camera display: Check the monitor to see if the camera feeds are displaying correctly. Make sure each camera’s field of view is clear and free from any obstructions.
- Adjust camera settings: Test the camera settings such as motion detection, recording schedules, and image quality to ensure they meet your surveillance needs.
- Test recording: Trigger motion events or manually start recording to verify that the system is capturing footage correctly.
- Remote viewing: If your system supports remote viewing, test accessing the cameras from a mobile device or computer to ensure connectivity.
- Alarm testing: If your system has alarm features, test them to ensure they trigger appropriately in case of emergencies.
By following these testing steps, you can ensure that your Floureon 8CH camera surveillance security system is fully functional and ready to protect your property.
Troubleshooting common installation issues
If you encounter any issues during the installation of your Floureon 8ch camera surveillance security system, here are some common problems and their solutions:
| Issue | Solution |
| No power to the cameras | Check the power source and make sure it is properly connected. Ensure that the power adapter is working correctly. |
| Poor image quality | Adjust the camera settings to improve the image quality. Check if there is any interference or obstruction affecting the camera’s view. |
| Camera not connecting to the DVR | Verify that the cameras are properly connected to the DVR. Check the cables and connections for any loose or damaged parts. |
| Issues with remote viewing | Ensure that the network settings are configured correctly for remote viewing. Check the port forwarding settings on your router. |
| System not recording | Check the hard drive status and storage capacity. Make sure the recording settings are configured properly in the DVR menu. |
Enjoying the peace of mind with your Floureon 8ch camera surveillance security system
Once you have successfully installed your Floureon 8ch camera surveillance security system, you can now enjoy the peace of mind that comes with knowing your property is protected. Here are some tips on how to maximize the benefits of your security system:
1. Remote monitoring
Take advantage of the remote monitoring feature of your Floureon system. This allows you to view live footage from your cameras on your smartphone or computer, giving you the ability to check on your property from anywhere at any time.
2. Motion detection alerts
Set up motion detection alerts on your Floureon system to receive notifications when any unusual activity is detected. This feature can help you stay informed and take immediate action if there is a potential security threat.
- Adjust the sensitivity of the motion detection to reduce false alarms.
- Customize the notification settings to receive alerts via email or push notifications on your phone.
By utilizing these features, you can enhance the security of your property and enjoy the peace of mind that comes with knowing you have a reliable surveillance system in place.