


Installing a security camera can provide peace of mind and added protection for your home or business. However, the process of drilling through a wall to mount the camera can be intimidating for some. With the right tools and techniques, you can easily and safely drill through a wall to install your security camera.
Step 1: Choose the Right Location
Before you start drilling, carefully choose the location where you want to mount the camera. Make sure it provides a clear view of the area you want to monitor and is within reach of power and network connections.
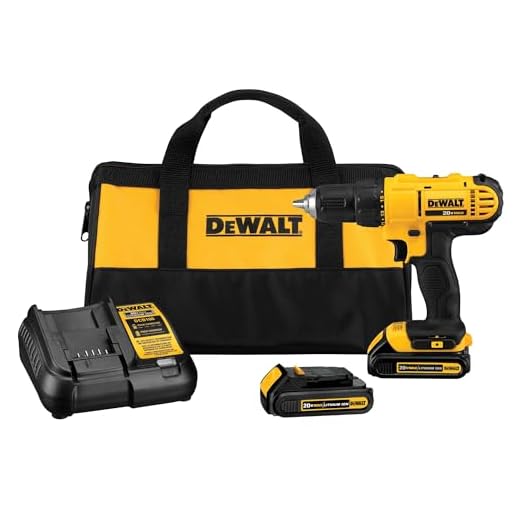
Step 2: Gather Your Tools
Make sure you have all the necessary tools and equipment, including a power drill with masonry bits, a level, a pencil, a tape measure, and safety gear such as goggles and gloves.
Step-by-step guide for drilling through wall for security camera
Installing a security camera on your property can provide peace of mind and added security. To properly install a security camera, you may need to drill through a wall to run cables or mount the camera. Follow these steps to safely drill through a wall for your security camera:

Materials Needed:
- Security camera
- Drill
- Masonry bit (if drilling through brick or concrete)
- Wall anchors
- Screws
- Cable clips or conduit
| Step | Instructions |
|---|---|
| 1 | Choose the location for your security camera and mark the spots for drilling. Make sure it is a secure and strategic location. |
| 2 | Check for any electrical wires or pipes behind the wall using a stud finder or similar tool to avoid damaging them. |
| 3 | Use the appropriate drill bit for your wall material (e.g., masonry bit for brick or concrete) and drill a hole at the marked spot. |
| 4 | If needed, insert wall anchors into the hole for added support. |
| 5 | Mount the security camera bracket or base using screws and secure it in place. |
| 6 | Run the cables through the drilled hole and secure them using cable clips or conduit to keep them neat and organized. |
| 7 | Attach the security camera to the bracket or base according to the manufacturer’s instructions. |
| 8 | Adjust the camera angle and test the camera to ensure it is working properly. |
Choose the right location
Before drilling through the wall for your security camera, it’s crucial to choose the right location. Consider the following factors:
- Visibility: Make sure the camera has a clear view of the area you want to monitor.
- Accessibility: Ensure the camera is easily accessible for maintenance and adjustments.
- Power source: Check if there’s a nearby power source for the camera.
- Weather protection: If the camera will be exposed to the elements, consider weatherproofing options.
Gather necessary tools
Before you start drilling through the wall for your security camera installation, make sure you have all the necessary tools on hand. Here is a list of tools you will need:
Tools:
- Drill: You will need a power drill to create the hole in the wall for the camera.
- Masonry bit: Make sure you have a masonry bit that is suitable for drilling through the material of your wall.
- Tape measure: Use a tape measure to accurately measure and mark the drilling location on the wall.
- Marker or pencil: Mark the spot where you will drill the hole for the camera mount.
- Level: A level will help you ensure that the camera is mounted straight on the wall.
- Safety goggles and gloves: Protect your eyes and hands while drilling through the wall.
Having these tools ready will make the installation process smoother and help you achieve a professional and secure camera placement.
Check for electrical wires
Before drilling through the wall for your security camera, it is crucial to check for any electrical wires that may be hidden behind the wall. Failure to do so can result in serious injury or damage. Here are some steps to follow:
Use a stud finder
Start by using a stud finder to locate any electrical wires that may be running through the wall. Follow the instructions on the stud finder to ensure accurate results.
Turn off power
Once you have identified the potential location of electrical wires, turn off the power supply to that area of the house. This will help prevent any accidents while drilling through the wall.
Mark drilling spot accurately
Before drilling through the wall for your security camera, it is crucial to mark the drilling spot accurately. This will ensure that the camera is installed in the desired location and at the correct angle.
Here are the steps to mark the drilling spot accurately:
- Use a measuring tape to determine the exact location where you want to install the security camera.
- Mark the spot with a pencil or marker. Make sure the mark is clear and visible.
- Double-check the position and height of the mark to ensure it aligns with your camera’s field of view.
By marking the drilling spot accurately, you can avoid any mistakes and ensure that your security camera is installed correctly for optimal surveillance.
Use proper drill and drill bits
When drilling through a wall for a security camera installation, it is essential to use the right drill and drill bits. Make sure to select a drill that is suitable for the material of your wall, whether it is wood, drywall, brick, or concrete. Using the wrong drill can damage the wall and make the installation process more difficult.
Additionally, choose the appropriate drill bits for the type of material you are drilling through. For example, masonry drill bits are designed for drilling into concrete or brick walls, while wood drill bits are better suited for wooden surfaces. Using the correct drill bits will ensure clean and precise holes for mounting your security camera.
Drill through the wall carefully
When drilling through the wall for your security camera installation, it’s essential to proceed with caution to avoid damaging the wall or causing any safety hazards. Follow these steps to ensure a smooth and safe drilling process:
1. Choose the right drill bit
Make sure you have the appropriate drill bit for the surface you are drilling through. For most walls, a masonry bit will be suitable. If you’re unsure, consult with a hardware store expert.
2. Mark the drilling spot
Use a pencil or marker to mark the exact spot where you want to drill. Double-check for any electrical wiring or plumbing behind the wall to avoid any accidents.
- Measure the distance from the floor or ceiling to ensure the camera placement is at the desired height.
- Use a level to make sure your markings are straight.
By following these steps and drilling carefully, you can successfully install your security camera without any issues.
Securely mount the camera
Once you have drilled the hole for your security camera, it’s time to securely mount it. Make sure to follow the manufacturer’s instructions for mounting the camera properly. Typically, this involves attaching the camera to a mounting bracket or base using screws.
Ensure that the camera is positioned correctly and securely fastened to the wall. Use a level to make sure the camera is straight and adjust as needed. This will help ensure that your camera provides the best possible view and coverage of the area you want to monitor.

Additionally, consider using weatherproofing materials or enclosures if your camera will be exposed to the elements. This will help protect the camera from damage and ensure its longevity.
Connect the camera to power source
Step 1: Locate a nearby power outlet or junction box where you can connect the camera’s power adapter.
Step 2: Plug the camera’s power adapter into the power outlet or junction box. Make sure the power source is stable and reliable.
Step 3: Connect the other end of the power adapter to the camera’s power input port. Ensure a secure connection.
Step 4: Turn on the power source and check if the camera is receiving power. You may need to wait for the camera to boot up.
Step 5: Once the camera is powered on, proceed with the setup and configuration according to the manufacturer’s instructions.
Adjust camera angle and settings
Once you have successfully installed the security camera, it is important to adjust the camera angle and settings for optimal performance. Start by positioning the camera to capture the desired area with clear visibility. Make sure there are no obstructions blocking the view.
Next, adjust the camera settings such as resolution, frame rate, and motion detection sensitivity to suit your security needs. Higher resolution provides clearer images but may require more storage space. Adjust the frame rate to balance image quality and storage usage. Fine-tune the motion detection sensitivity to reduce false alarms.
Regularly check and adjust the camera angle and settings to ensure your security camera is functioning effectively and capturing important footage.
Test camera functionality
Once you have successfully mounted the security camera on the wall and connected it to the power source and your recording device, it is essential to test the camera’s functionality to ensure it is operating correctly.
1. Check the video feed
Access the camera feed on your monitoring device or computer to ensure that the camera is capturing clear images and video of the area you want to monitor. Make sure the camera angle and focus are adjusted properly for maximum coverage.
2. Test motion detection
Move in front of the camera to check if the motion detection feature is working correctly. The camera should start recording when it detects motion within its range. Adjust the sensitivity settings if needed to avoid false alarms.


