
 Carmen J. Moore
When it comes to securing your home or business, installing security cameras is a smart choice. However, ensuring that your cameras are powered properly is crucial for their effectiveness. One way to ensure a reliable power source for your security cameras is by adding outlets specifically for them.
Adding outlets for security cameras may seem like a daunting task, but with the right tools and know-how, it can be a straightforward process. In this guide, we will walk you through the steps to add outlets for your security cameras, so you can have peace of mind knowing that your property is well-protected.
From planning the location of the outlets to running the necessary wiring, we will provide you with all the information you need to successfully add outlets for your security cameras. With these tips, you can enhance the security of your property and have a reliable power source for your cameras.
Planning Your Camera Placement
Before adding outlets for security cameras, it’s important to carefully plan the placement of each camera to ensure maximum coverage and effectiveness. Consider the following factors:


- Areas to Monitor: Identify the key areas of your property that require surveillance, such as entry points, driveways, and high-traffic areas.
- Camera Type: Choose the appropriate camera type (e.g., dome, bullet, PTZ) based on the specific monitoring needs of each location.
- Field of View: Determine the optimal angle and field of view for each camera to capture the necessary footage without blind spots.
- Power Source: Plan the placement of outlets near each camera location to ensure easy access to power without the need for lengthy cables.
- Height and Angle: Install cameras at a height and angle that provide a clear view of the area while minimizing the risk of tampering or obstruction.
By carefully planning your camera placement, you can enhance the security of your property and maximize the effectiveness of your surveillance system.
Choosing the Right Locations
When adding outlets for security cameras, it is crucial to choose the right locations to ensure optimal coverage and security. Here are some key factors to consider:
1. Strategic Placement
Place outlets in strategic locations where they can cover the most vulnerable areas of your property. Consider the line of sight, potential blind spots, and the overall layout of the area.
2. Accessibility
Ensure that the outlets are easily accessible for maintenance and troubleshooting. Avoid placing them in hard-to-reach or hidden locations that may impede proper functioning and monitoring.
Considerations for Indoor vs. Outdoor Cameras
When adding outlets for security cameras, it’s important to consider whether you will be installing indoor or outdoor cameras. Here are some key considerations:
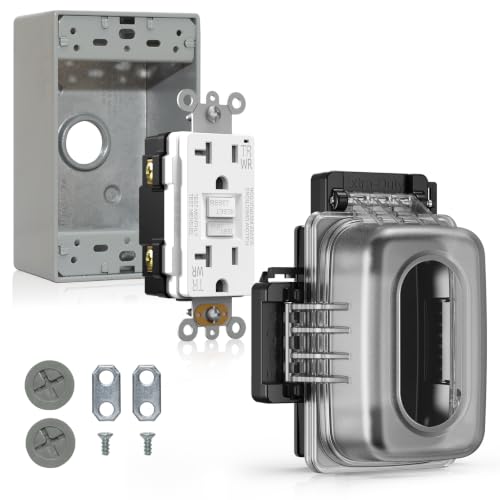
- Weatherproofing: Outdoor cameras need to be weatherproof to withstand rain, snow, and extreme temperatures. Make sure the outlets you install for outdoor cameras are weatherproof and suitable for outdoor use.
- Visibility: Outdoor cameras should have a clear line of sight and be placed in a visible location to deter potential intruders. Indoor cameras, on the other hand, can be discreetly placed to monitor indoor spaces without being obtrusive.
- Power Source: Outdoor cameras may require a power source that can withstand outdoor conditions, such as a weatherproof outlet or a power over Ethernet (PoE) connection. Indoor cameras can typically be plugged into a standard indoor outlet.
- Mounting Options: Outdoor cameras may require special mounting hardware to securely attach them to the exterior of a building. Indoor cameras can often be placed on a shelf or mounted on a wall using standard mounting brackets.
- Remote Access: Consider whether you want to be able to access your camera footage remotely. Outdoor cameras may require a stronger Wi-Fi signal or a wired connection for reliable remote access.
Installing Electrical Outlets
When adding outlets for security cameras, it is essential to ensure proper installation to provide power to the cameras. Here are the steps to follow:
1. Determine the Location
Decide where you want to install the outlet for the security camera. It should be near the camera for easy access to power.
2. Turn off Power
Before starting any electrical work, make sure to turn off the power to the area where you will be installing the outlet. This is crucial for your safety.
- Locate the circuit breaker that controls the power to the area.
- Switch off the circuit breaker to cut off power.
3. Install the Outlet
Follow these steps to install the outlet:
- Remove the cover plate from the existing outlet box.
- Connect the new outlet to the wiring inside the box, following the manufacturer’s instructions.
- Secure the outlet in place and replace the cover plate.
Once the outlet is installed, you can now connect the security camera to it and ensure it is receiving power.
Consulting with an Electrician
Before adding outlets for security cameras, it is important to consult with a qualified electrician. They can assess your current electrical system and provide recommendations on the best placement for the new outlets. An electrician will ensure that the wiring is done correctly and up to code, minimizing the risk of electrical hazards.
Benefits of Consulting with an Electrician:
- Expert advice on outlet placement
- Ensures compliance with electrical codes
- Minimizes the risk of electrical hazards
By working with an electrician, you can ensure that your security camera installation is done safely and effectively.
Options for Adding Outlets
When adding outlets for security cameras, you have a few options to consider:
1. Hardwiring: This involves running new electrical wiring from your main electrical panel to the location where you want to install the outlet. This method provides a dedicated power source for your security camera.
2. Using Existing Outlets: You can tap into existing outlets in your home to power your security camera. This is a more cost-effective option but may require additional wiring and electrical work.
3. Wireless Power Adapters: Another option is to use wireless power adapters that allow you to transmit power wirelessly to your security camera. This eliminates the need for running new wires and can be a convenient solution in certain situations.
Consider the layout of your home and the location of your security cameras when deciding on the best option for adding outlets.
Connecting Cameras to Outlets
When adding outlets for security cameras, it’s important to properly connect the cameras to the outlets to ensure they function correctly. Here are the steps to connect cameras to outlets:
- Locate the power adapter that came with the camera.
- Plug the power adapter into a nearby outlet.
- Connect the power adapter to the camera using the provided cable.
- Ensure the camera is securely mounted and positioned correctly.
- Test the camera to make sure it is receiving power and functioning properly.
By following these steps, you can easily connect your security cameras to outlets and enhance your home or business security system.
Using Power Over Ethernet (PoE)
Power Over Ethernet (PoE) is a convenient way to power your security cameras without the need for separate power outlets. With PoE, you can transmit both power and data over a single Ethernet cable, simplifying the installation process and reducing the number of cables needed.
When setting up security cameras with PoE, you will need a PoE switch or injector to provide power to the cameras. The PoE switch or injector will connect to your network and distribute power to the cameras through the Ethernet cables.
Make sure to check the power requirements of your security cameras to ensure that the PoE switch or injector can deliver enough power to each camera. Additionally, pay attention to the maximum cable length supported by PoE to avoid voltage drop over long distances.
By using PoE for your security cameras, you can streamline the installation process and create a cleaner setup with fewer cables running to each camera.
Wireless Camera Options
When adding security cameras to your property, you may want to consider wireless options for added convenience and flexibility. Wireless cameras are easy to install and can be placed virtually anywhere without the need for complicated wiring. They are ideal for areas where running wires is impractical or difficult.
There are various types of wireless security cameras available, including battery-powered cameras, solar-powered cameras, and Wi-Fi-enabled cameras. Battery-powered cameras are a good option for locations without access to power outlets, while solar-powered cameras are a sustainable choice for outdoor areas with ample sunlight. Wi-Fi-enabled cameras can connect to your home network for remote viewing and monitoring.
Wireless cameras are typically easy to set up and can be controlled through a mobile app or a web interface. They offer flexibility in placement and can be moved around as needed. When choosing a wireless camera, consider factors such as battery life, video quality, motion detection capabilities, and compatibility with your existing security system.



I recently installed outlets for my security cameras, and I found that planning the camera placement was key. I placed them near entry points, and it made a huge difference in coverage!
Thanks for sharing your experience! Planning the placement is indeed crucial for maximizing security.
Is hardwiring the only option for adding outlets, or do wireless options work well too?
Wireless power adapters are a viable option for some setups, but they may not be as reliable as hardwiring. It depends on your specific needs and layout.
I recently installed outlets for my outdoor cameras. I used weatherproof outlets and they work great. Just make sure to follow all safety protocols, especially when working with electrical installations. I also consulted an electrician to ensure everything was up to code, which I highly recommend!
I disagree with the idea of using existing outlets for security cameras. It can be too limiting and might not provide enough power. Hardwiring seems more reliable to me.
What tools do I need to install outlets for my security cameras? I’m a beginner and want to make sure I have everything before starting.
The article mentions PoE, but I’m not clear on how it works. Can someone explain how I can set it up for my cameras? Do I need special equipment?
I think it's better to use existing outlets instead of installing new ones. It saves time and money, why go through the hassle?
Using existing outlets can be cost-effective, but it may limit the placement and power availability for your cameras. It's essential to weigh the pros and cons based on your situation.
Do I really need to consult with an electrician for this?
Consulting with an electrician is advisable to ensure safety and compliance with electrical codes, especially when dealing with new wiring.
I was considering both hardwiring and using wireless power adapters for my cameras. Hardwiring seems more reliable, but the wireless option would be convenient. Can anyone share their experience with both methods?
What tools do I need to add outlets for my security cameras?
Can I use a regular outlet for outdoor cameras, or do I need something specific?
Outdoor cameras require weatherproof outlets to withstand the elements. It's important to ensure they are suitable for outdoor use.