


When it comes to scanning film using a DSLR camera, achieving accurate colors and maintaining proper white balance is crucial. The white balance setting on your camera determines how it interprets and adjusts colors based on the lighting conditions of the scene you are photographing.
One of the best white balance settings for DSLR film scanning is the “Custom” or “Preset” option. This allows you to manually set the white balance based on a neutral reference point in your scene. To achieve the most accurate white balance, it is recommended to use a gray card or a color calibration target as your reference point.
Using a gray card, which is designed to have a neutral gray color, allows you to easily set the white balance of your camera. Simply place the gray card in the scene you are photographing, fill the frame with the card, and take a photo. Then, in your camera’s settings, select the “Custom” or “Preset” white balance option and use the photo of the gray card as your reference.

An alternative to using a gray card is a color calibration target, which consists of multiple color patches representing a range of colors. By photographing this target and selecting the corresponding white balance option in your camera’s settings, you can ensure accurate color reproduction when scanning your film.
While using the “Custom” or “Preset” white balance option is recommended for DSLR film scanning, it is important to note that lighting conditions can vary, and it may be necessary to adjust the white balance settings accordingly. Regularly checking and fine-tuning the white balance throughout your scanning process will help you achieve the best possible results.
Understanding the Importance of White Balance in DSLR Film Scanning
As a photographer and film enthusiast, I have come to realize the significant role that white balance plays in DSLR film scanning. White balance refers to the process of adjusting the colors in a photograph or scanned film to accurately represent the true colors as they appear in real life. Without proper white balance, the colors in a scanned film may appear unnatural or distorted, making it difficult to appreciate the true beauty of the images.
When it comes to DSLR film scanning, selecting the best camera white balance is crucial in achieving accurate and vibrant results. The white balance setting on a DSLR camera allows photographers to adjust the overall color temperature of their images. By correctly setting the white balance, it becomes possible to neutralize any color casts caused by different light sources and ensure that the film’s true colors are faithfully reproduced.
Proper white balance is especially important when scanning film because it allows for accurate color reproduction. A film negative or slide may have a specific color temperature that varies depending on the lighting conditions and the type of film used. By adjusting the white balance settings on the camera, it becomes possible to compensate for these variations and capture the film’s true colors in the digital scan.
In conclusion, understanding the importance of white balance in DSLR film scanning is essential for achieving accurate and vibrant results. By selecting the appropriate white balance settings on the camera, photographers can ensure that the colors in their scanned films are faithfully represented and that the true beauty of the images is preserved. Don’t underestimate the power of white balance when it comes to film scanning – it’s a tool that can make a significant difference in the final outcome.
The basics of white balance in DSLR film scanning
In DSLR film scanning, white balance plays a crucial role in achieving accurate color reproduction. White balance refers to the process of neutralizing any color cast in an image caused by the lighting conditions during the scanning process. By setting the correct white balance, you can ensure that the colors captured by the camera are as close to the original film as possible.
There are several methods to set the white balance in DSLR film scanning. One common approach is to use a gray card or a color calibration target. These tools provide a neutral reference point that the camera can use to adjust the colors in the image. By photographing the gray card or color calibration target under the same lighting conditions as the film, you can create a custom white balance setting that accurately represents the colors in the film.
Another method is to use the camera’s preset white balance settings. Most DSLR cameras offer different preset white balance options, such as daylight, cloudy, fluorescent, and tungsten. These presets are calibrated to the typical color temperature of different light sources. By selecting the appropriate preset based on the lighting conditions, you can achieve a close approximation of the correct white balance for your film scans.
It’s important to note that even with the correct white balance setting, some adjustments may still be necessary during post-processing. Factors such as film age and degradation can affect the colors in the film, and slight tweaks may be required to restore the original intended colors. Additionally, personal preference or artistic choices may also influence the final color rendition of film scans. Experimentation and practice are key to mastering the art of white balance in DSLR film scanning.
How to Choose the Best Camera White Balance Settings for Film Scanning
When it comes to film scanning, achieving accurate colors is crucial. One of the key factors that can affect color accuracy is the camera white balance settings. In order to choose the best white balance settings for film scanning, I consider a few important factors.
Understanding the Film Base Color: Before selecting the white balance settings, it is necessary to understand the inherent color of the film base. This can differ between different film stocks and can range from slightly warm to slightly cool. By knowing the film base color, I can adjust the white balance settings accordingly to compensate for any color shifts.
Using a Gray Card: Another useful technique is to use a gray card during the scanning process. This gray card serves as a reference point for proper white balance calibration. By including the gray card in one of the frames during the scanning process and using it to set the white balance, I can ensure that the colors in the scanned images are accurate.
Experimenting with Different White Balance Settings: While understanding the film base color and using a gray card are helpful, sometimes it may be necessary to experiment with different white balance settings to achieve the desired color accuracy. This can involve adjustments in temperature and tint values to fine-tune the white balance until the colors in the scanned images closely match the original film.
Regular Calibration and Testing: Lastly, it is important to regularly calibrate the camera’s white balance settings and test the results. Environmental factors such as lighting conditions or changes in film stocks may require adjustments to the white balance settings. By regularly calibrating and testing, I can consistently achieve the best color accuracy in my film scans.
In conclusion,
Choosing the best camera white balance settings for film scanning involves understanding the film base color, using a gray card as a reference, experimenting with different settings, and regularly calibrating and testing. By taking these factors into consideration, I can ensure that the colors in my scanned images accurately represent the original film.
Exploring the different white balance presets for DSLR film scanning
As a film enthusiast and amateur photographer, I have always been intrigued by the process of digitizing film using a DSLR. One of the key elements in this process is achieving an accurate white balance, as it determines the overall color accuracy of the scanned images.
When it comes to white balance presets, most DSLRs offer a range of options including daylight, tungsten, fluorescent, and cloudy. Each preset is designed to compensate for the color temperature of different lighting conditions, providing a neutral and balanced color reproduction.
- Daylight: The daylight preset is ideal for scanning film negatives or positives shot in natural daylight. It is calibrated to a specific color temperature, typically around 5500K, which is considered the standard temperature for daylight conditions. This preset ensures accurate color reproduction and minimizes any unwanted color casts.
- Tungsten: The tungsten preset is suitable for film scans taken under artificial incandescent lighting, which has a warm and yellowish tone. This preset adjusts the white balance to counteract the orange tint, resulting in a more neutral color temperature.
- Fluorescent: The fluorescent preset is designed for film scans taken under fluorescent lighting, which can have a cool and bluish tone. This preset compensates for the bluish hue, creating a more natural white balance and reducing any unwanted color casts.
- Cloudy: The cloudy preset is useful when scanning film shots taken on overcast days or in shaded areas. It enhances the warmth in the image, providing a slightly higher color temperature to counteract the cool lighting conditions.
While the presets mentioned above offer a good starting point, it’s essential to remember that each film stock has unique color characteristics. Experimenting with different white balance presets can help to achieve the desired look and feel of the scanned images. Additionally, fine-tuning the white balance in post-processing software can further enhance the color accuracy and overall quality of the final digital scans.
Customizing white balance for accurate colors in film scanning
When it comes to film scanning, capturing accurate colors is essential to properly reproduce the original image. One critical aspect of achieving accurate colors is customizing the white balance settings of your DSLR camera. By adjusting the white balance, you can ensure that the colors captured in the scanned image closely resemble the colors of the original film.
There are several methods you can use to customize the white balance for film scanning. One approach is to use a gray card or white balance target. By placing the gray card or target in the frame and setting a custom white balance using this reference point, you can accurately calibrate your camera to the correct color temperature and tint for the film being scanned. This method is particularly useful when dealing with films that have specific color biases, such as tungsten-balanced films or slide films.
Another approach to customizing white balance is to use a color calibration chart. These charts typically include a range of color swatches that represent various hues and tones. By photographing the color chart and then adjusting the white balance settings in post-processing based on the known colors of the chart, you can achieve accurate colors in your scanned images. This method can be especially useful for scanning films with unique color characteristics, such as expired films or films with unusual color shifts.
Overall, customizing the white balance for film scanning is crucial for obtaining accurate colors in your scanned images. Whether you prefer using a gray card or a color calibration chart, taking the time to fine-tune your camera’s white balance settings will ultimately result in more faithful reproductions of the original film’s colors.
Tips for achieving optimal white balance in DSLR film scanning
As someone who has experienced the challenges of DSLR film scanning, I have learned a few valuable tips for achieving optimal white balance in the process. White balance is crucial in reproducing accurate colors and tones from film negatives, and getting it right can make a significant difference in the final scanned images.
1. Calibrate your monitor: Before starting the film scanning process, it is essential to calibrate your monitor to ensure accurate color representation. Use a color calibration tool to adjust your monitor’s settings, such as brightness, contrast, and color temperature, to match industry standards.
2. Shoot in RAW: When scanning film using a DSLR camera, it is highly recommended to shoot in RAW format. RAW files contain unprocessed data, giving you more flexibility in post-processing, including adjusting white balance. This allows you to fine-tune the white balance settings during the editing process.
3. Use a gray card: One effective method to achieve accurate white balance is to use a gray card. Place the gray card in the frame before taking your shots, ensuring it is properly exposed. During post-processing, use the gray card as a reference point to adjust the white balance and neutralize any color casts.
4. Experiment with different white balance settings: Don’t be afraid to experiment with different white balance settings in your camera or editing software. There isn’t a one-size-fits-all approach, as the ideal white balance can vary depending on the specific film stock and lighting conditions. Take test shots using different settings and compare the results to determine the most accurate white balance for each film negative.
5. Consider using a dedicated white balance tool: For more precise white balance adjustments, you may consider investing in a dedicated white balance tool. These tools allow you to capture a reference image with a neutral gray or white object and set the white balance based on that image, ensuring accurate color rendering.
6. Fine-tune in post-processing: Even with the best white balance settings during the scanning process, some fine-tuning may still be necessary during post-processing. Use image editing software to further adjust the white balance if needed, paying attention to the overall color temperature, tint, and any color casts present.
By following these tips, you can improve your white balance accuracy when scanning film using a DSLR camera. Remember that practice makes perfect, and it may take some trial and error to find the best white balance settings for your specific film and equipment.
The impact of white balance on the quality of film scans
As a photographer who specializes in film scanning, I understand the importance of achieving the best possible white balance for capturing accurate and high-quality scans. White balance plays a crucial role in determining the overall color accuracy and tone of a digital image, especially when working with film negatives. It involves selecting the right color temperature to ensure that whites appear neutral and colors are rendered true to life.
When it comes to film scanning, achieving the correct white balance is essential for faithfully reproducing the original colors and tones of the film. If the white balance is off, it can result in color casts and inaccurate representation of the scene. For example, if the white balance is too warm, the image may appear yellowish, while a too cool white balance can make the image appear bluish. Finding the perfect balance is crucial for capturing the true essence of the film and bringing out its unique characteristics.
There are several ways to adjust the white balance for film scanning. One common method is to use a gray card or a color chart as a reference point. By photographing the gray card or color chart under the same lighting conditions as the film, you can use it as a reference point to set the correct white balance in your scanning software. Another option is to use custom white balance tools available in many DSLR cameras. These tools allow you to manually adjust the white balance by taking a picture of a neutral reference object, such as a white or gray card.
In conclusion, getting the white balance right is crucial for achieving the best quality film scans. By understanding the impact of white balance on color accuracy and tone reproduction, photographers can ensure that their film scans truly represent the essence of the original film. Experimenting with different white balance settings and using reference tools can help photographers fine-tune their scanning process for optimal results.
White Balance Tips and Tricks for DSLR Film Scanning
As a filmmaker, one of the key aspects of digital film scanning is achieving the correct white balance. Having the right white balance is crucial for accurately reproducing colors and achieving the desired aesthetic in your scans. Here are some tips and tricks to help you get the best results:
1. Use a grey card or white balance target
Using a grey card or a white balance target can provide a reference point for setting the white balance. Simply place the card or target in the frame before scanning and use it to set the white balance in your camera. This ensures that you have a neutral reference point to work with and helps to eliminate any color casts in your scans.
2. Shoot in RAW format
Shooting in RAW format allows you to adjust the white balance in post-production with greater flexibility. Unlike shooting in JPEG, RAW files retain all the original data captured by the camera’s sensor, giving you more control over the final white balance during the scanning process.
3. Experiment with different color temperatures
Don’t be afraid to experiment with different white balance settings and color temperatures to achieve the desired look for your scans. Different lighting conditions can have a significant impact on the overall color temperature, so it’s important to play around with the settings to find the right balance for each specific scanning session.
4. Consider using a color calibration tool
If you want to ensure accurate and consistent white balance in your scans, it may be worth investing in a color calibration tool. These tools can help you calibrate your camera’s settings to achieve accurate color reproduction and eliminate any color inconsistencies that may arise during the scanning process.
- Use a grey card or white balance target as a reference point
- Shoot in RAW format for more flexibility in post-production
- Experiment with different white balance settings and color temperatures
- Consider using a color calibration tool for greater accuracy and consistency
Understanding color temperature and white balance in film scanning
Introduction
As a film enthusiast and someone who enjoys the process of scanning film negatives, I have come to appreciate the importance of color temperature and white balance in achieving accurate and pleasing scans. Understanding these concepts can greatly enhance the final results of your film scanning workflow.
What is color temperature?
Color temperature refers to the perceived warmth or coolness of light. It is measured in degrees Kelvin (K) and ranges from warm (lower Kelvin values) to cool (higher Kelvin values). Different light sources emit light with different color temperatures, and this can greatly affect the colors captured in your scans.
Why is white balance important?
White balance is the process of adjusting the color temperature to ensure that white appears as a neutral color in your scans. When white is not accurately represented in a scan, other colors can also be affected and appear either too warm or too cool. Achieving the correct white balance is crucial for accurate color reproduction and to maintain the integrity of the original film.
How to set the white balance for film scanning
Setting the white balance for film scanning can be done in a few simple steps:
- First, set up your film scanner and ensure that the scanning software is properly calibrated.
- Place a white balance target, such as a gray card, in the scanning area.
- Using the scanning software, select the white balance option and click on the area of the image that should be white.
- The software will then adjust the color temperature to make the selected area appear as neutral white.
- Preview the scan and make further adjustments if necessary to achieve the desired color balance.
Conclusion
Understanding color temperature and white balance in film scanning is essential for achieving accurate and true-to-life scans. By properly setting the white balance, you can ensure that the colors in your scans are faithful to the original film. Experimenting with different color temperatures and adjusting the white balance can also allow for artistic interpretation and creative control over the final results.
Expert recommendations for white balance settings in DSLR film scanning
White balance is a crucial setting when it comes to DSLR film scanning. Setting the white balance correctly ensures that the colors in your scans are accurate and true to life. To help you achieve the best results, we have gathered expert recommendations for white balance settings in DSLR film scanning:
- Use a neutral gray card: Many experts recommend using a neutral gray card as a reference for setting the white balance. This ensures that the colors in your scans are not affected by any color casts present in the film.
- Custom white balance: Some experts recommend setting a custom white balance on your camera using a white or neutral gray target. This allows you to calibrate the white balance specifically for your scanning setup, resulting in more accurate colors.
- Avoid using auto white balance: While auto white balance can be convenient, it may not always produce accurate colors in film scanning. It is recommended to use manual white balance settings to have more control over the final results.
- Experiment and adjust: Every film and scanning setup is different, so it’s important to experiment with white balance settings and make adjustments based on your specific requirements. Test different settings and compare the results to find the best white balance for your scanning workflow.
By following these expert recommendations, you can ensure that your DSLR film scans have accurate and true-to-life colors. Remember to take into account the characteristics of your film and the specific conditions of your scanning setup when adjusting the white balance settings. Happy scanning!
Best camera white balance for dslr film scanning
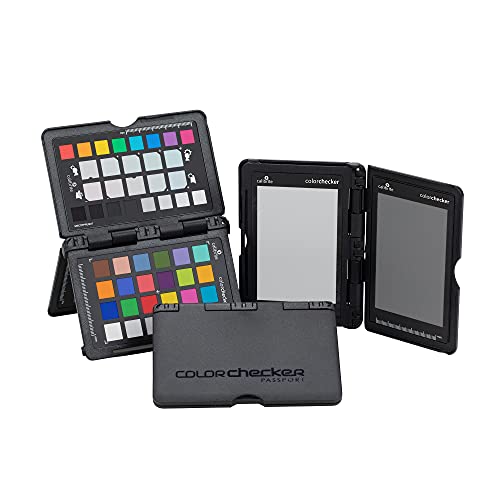
Calibrite ColorChecker Passport Photo 2
Features
| Part Number | CCPP2 |
| Model | CCPP2 |
| Warranty | 1 Year Limited |
| Color | Multi Coloured Patches |
| Release Date | 2021-07-01T00:00:01Z |
| Size | Passport Photo 2 |


| Price history for Calibrite ColorChecker Passport Photo 2 | |
|---|---|
|
Latest updates:
|
|
Calibrite ColorChecker White Balance
Features
| Part Number | CCWB |
| Model | CCWB |
| Warranty | 1 Year Limited |
| Color | Light gray |
| Release Date | 2021-07-01T00:00:01Z |
| Size | White Balance |
| Format | Other Calendar |

| Price history for Calibrite ColorChecker White Balance | |
|---|---|
|
Latest updates:
|
|
JJC 35mm Photo Slide Digitizing Adapter
Features
| Part Number | FDA-S1-WF |
| Warranty | 0 |
| Size | Negative Digitizer with LED Light |


Datacolor Spyder Checkr Calibration Tool
Features
| Part Number | SCK100 |
| Model | SCK100 |
| Warranty | 1 year Hardware Warranty |
| Is Adult Product | |
| Language | English |


| Price history for Datacolor Spyder Checkr Calibration Tool | |
|---|---|
|
Latest updates:
|
|
Datacolor 2024 Monitor Calibration Tool
Features
| Part Number | SP2024 |
| Model | SP2024 |
| Warranty | 1 year manufacturer |
| Color | Spyder (2024) |
| Release Date | 2024-09-17T00:00:01Z |


Question and answers:
What is white balance in DSLR film scanning?
White balance is the process of adjusting the colors in a digital image to make it appear as close as possible to how it would look in the original scene. In DSLR film scanning, it refers to setting the correct white balance to ensure accurate and natural color reproduction in the scanned film.
Why is white balance important in DSLR film scanning?
White balance is important in DSLR film scanning because it helps to achieve accurate and natural color reproduction. Different light sources have different color temperatures, and the white balance settings help to neutralize these color casts and ensure that the scanned film looks true to the original scene.
What is the best white balance setting for DSLR film scanning?
The best white balance setting for DSLR film scanning depends on the specific lighting conditions and the desired look of the scanned film. However, a common white balance setting is to use the “Daylight” or “Auto” white balance mode, as these settings tend to produce accurate and natural colors in most situations.
Are there any specific white balance settings to use for different types of film?
Yes, there are specific white balance settings that can be used for different types of film. For example, if you are scanning a color negative film, you can try using the “Tungsten” white balance setting if the scene was lit with tungsten lighting. If you are scanning a slide film, you can try using the “Daylight” white balance setting for accurate color reproduction.
Can I adjust the white balance after scanning the film?
Yes, you can adjust the white balance after scanning the film using image editing software. However, it is generally recommended to set the correct white balance during the scanning process itself to save time and ensure accurate color reproduction. Adjusting the white balance after scanning may result in some loss of image quality.


