


Are you tired of the poor video quality of your laptop’s built-in webcam? Do you want to upgrade your video conferencing experience without investing in a new webcam? If you have a digital camera laying around, you can easily turn it into a high-quality webcam with just a few simple steps.
Using your digital camera as a webcam can significantly improve the video and audio quality of your online meetings, video calls, and live streams. In this article, we will guide you through the process of setting up your digital camera as a webcam on both Windows and Mac computers.
Whether you’re a content creator, business professional, or just someone who wants to look their best on video calls, turning your digital camera into a webcam is a cost-effective and easy solution. Say goodbye to grainy, blurry video and hello to crisp, clear footage with your digital camera!
Guide to Turning Your Digital Camera into a Webcam
If you want to elevate your video conferencing game and improve the quality of your video calls, turning your digital camera into a webcam is a great option. Many digital cameras have superior image quality compared to built-in webcams, providing clearer and crisper video during your calls. Follow these steps to transform your digital camera into a webcam:
Step 1: Check if your digital camera has a clean HDMI output. This is essential for using your camera as a webcam. If your camera does not have this feature, you may need to consider alternative methods.
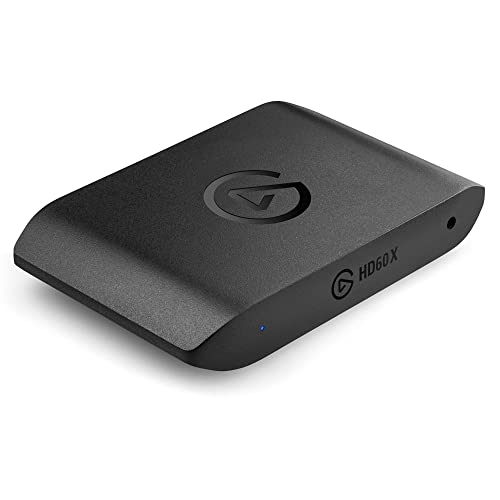
Step 2: Purchase an HDMI capture card. This device will allow you to connect your camera to your computer and use it as a webcam. Make sure to choose a high-quality capture card for the best results.
Step 3: Install the necessary drivers and software for your HDMI capture card. Follow the instructions provided by the manufacturer to set up the device correctly on your computer.
Step 4: Connect your digital camera to the HDMI capture card using an HDMI cable. Ensure that everything is properly connected and powered on before proceeding.
Step 5: Open your video conferencing software and select your digital camera as the video input source. You should now see the video feed from your camera on your computer screen.
Step 6: Adjust the settings on your camera and in the video conferencing software to optimize the video quality and ensure a smooth video call experience.
By following these steps, you can easily turn your digital camera into a high-quality webcam for all your video conferencing needs. Enjoy crystal-clear video and impress your colleagues and friends with professional-looking video calls.
Step-by-Step Instructions
1. Check Compatibility: Make sure your digital camera is compatible with the software you plan to use to turn it into a webcam.
2. Install Necessary Software: Download and install the required software on your computer. This could include camera drivers, webcam software, or streaming apps.
3. Connect Your Camera: Use the appropriate cables to connect your digital camera to your computer. Make sure it is recognized by the software you installed.
4. Configure Settings: Open the webcam software and configure the settings for your camera, such as resolution, frame rate, and audio input.
5. Test Your Setup: Test your camera as a webcam by launching a video conferencing app or using a webcam testing website to ensure everything is working properly.
6. Adjust as Needed: Fine-tune the settings and make any necessary adjustments to ensure optimal video and audio quality for your webcam setup.
Required Equipment
To turn your digital camera into a webcam, you will need the following equipment:
| 1. Digital Camera: | Make sure you have a digital camera with a USB connection or HDMI output that can be used as a webcam. |
| 2. USB Cable or HDMI Cable: | You will need a USB cable or HDMI cable to connect your digital camera to your computer. |
| 3. Tripod or Camera Mount: | For stability and positioning, consider using a tripod or camera mount to keep your digital camera in place. |
Ensure that you have all the necessary equipment before proceeding with the setup process.
Choosing the Right Software
When it comes to turning your digital camera into a webcam, choosing the right software is crucial. There are several options available, each with its own set of features and compatibility. Here are some factors to consider when selecting the software:
- Compatibility: Make sure the software is compatible with your operating system and digital camera model.
- Features: Look for software that offers the features you need, such as video recording, live streaming, and customizable settings.
- Ease of Use: Choose software that is user-friendly and easy to set up. You don’t want to spend hours trying to configure the software.
- Reliability: Opt for software that is stable and reliable to avoid any interruptions during your webcam sessions.
By considering these factors, you can choose the right software to turn your digital camera into a webcam and enjoy high-quality video conferencing and streaming.
Connecting Your Camera
Before you can use your digital camera as a webcam, you need to connect it to your computer. Here’s how:
- Locate the USB cable that came with your camera.
- Connect one end of the USB cable to your camera.
- Connect the other end of the USB cable to a USB port on your computer.
- Turn on your camera and set it to the appropriate mode for using it as a webcam.
Additional Tips:
- Make sure your camera is fully charged or connected to a power source to avoid it turning off during use.
- Check your camera’s settings to ensure it is set up correctly for use as a webcam.
Adjusting Camera Settings
Before using your digital camera as a webcam, it’s important to adjust the camera settings to ensure optimal performance. Here are some key settings to consider:
1. Resolution
Set the resolution of your camera to match the resolution supported by your computer or video conferencing software. A higher resolution will provide better image quality but may require more bandwidth.
2. Frame Rate
Adjust the frame rate of your camera to ensure smooth video streaming. A higher frame rate will result in smoother video playback, but may also require more processing power.
| Setting | Optimal Value |
| Resolution | 1280×720 (720p) or 1920×1080 (1080p) |
| Frame Rate | 30 frames per second (fps) |
Testing Your Setup
Once you have connected your digital camera to your computer and set it up as a webcam, it’s time to test your setup to ensure everything is working correctly. Here are a few steps to help you test your setup:
Step 1: Open a Video Conferencing App
Launch a video conferencing application such as Zoom, Skype, or Google Meet on your computer. Make sure to select your digital camera as the webcam device in the settings of the application.
Step 2: Check the Video and Audio
Start a video call or meeting in the video conferencing app and check if the video and audio from your digital camera are working properly. Make sure you are properly framed and the audio is clear.
Troubleshooting Tips
If you are experiencing issues with turning your digital camera into a webcam, here are some troubleshooting tips to help you resolve them:
| Issue | Solution |
| Camera not recognized by computer | Ensure that the camera is properly connected to the computer via USB and that the correct drivers are installed. Try using a different USB port or cable. |
| Poor video quality | Check the resolution settings on your camera and adjust them for better quality. Make sure there is adequate lighting in the room. |
| No audio | Check the audio settings on your computer and camera. Ensure that the microphone is enabled and properly connected. |
| Camera overheating | Allow the camera to cool down before using it for an extended period. Avoid using the camera in direct sunlight or in hot environments. |
Additional Tips and Tricks
Here are some additional tips and tricks to help you get the most out of using your digital camera as a webcam:
1. Lighting is Key
Make sure you have good lighting when using your digital camera as a webcam. Natural light is usually the best option, but if that’s not available, consider investing in a ring light or other lighting equipment to ensure you look your best on camera.
2. Adjust Camera Settings
Take the time to adjust the settings on your digital camera to optimize its performance as a webcam. This may include adjusting the white balance, exposure, and focus settings to ensure you get the best image quality possible.
By following these additional tips and tricks, you can make the most of using your digital camera as a webcam and enhance your video conferencing experience.
Final Thoughts
Turning your digital camera into a webcam can greatly enhance the quality of your video calls and online meetings. By following the steps outlined in this guide, you can easily transform your camera into a high-quality webcam without having to invest in a separate device.
Remember to check for compatibility with your camera model and computer system before getting started. Additionally, make sure to adjust the settings on your camera to optimize the video quality for your specific needs.
Stay Connected
With your digital camera now serving as a webcam, you can enjoy crisp, clear video and audio during your virtual meetings and calls. Stay connected with friends, family, and colleagues in style!
FAQ
Can I use my digital camera as a webcam?
Yes, you can use your digital camera as a webcam with the help of some software applications. By connecting your camera to your computer and using the right software, you can turn your camera into a high-quality webcam for video calls, live streaming, and more.
What software do I need to turn my digital camera into a webcam?
To turn your digital camera into a webcam, you will need software like SparkoCam, ManyCam, or OBS Studio. These programs allow you to connect your camera to your computer and use it as a webcam for various applications. Simply install the software, connect your camera, and start using it for video calls and other activities.


