
 Carmen J. Moore

Is your front camera on your iPhone 6 Plus not working properly? It can be frustrating when you can’t take selfies or make video calls due to camera issues. But don’t worry, there are several troubleshooting steps you can take to fix the problem and get your front camera working again.
In this guide, we will walk you through some common solutions to front camera problems on the iPhone 6 Plus. Whether your front camera is blurry, not focusing, or simply not working, we’ve got you covered with tips and tricks to help you resolve the issue.
Guide to Repairing Front Camera on iPhone 6 Plus
If you are experiencing issues with the front camera on your iPhone 6 Plus, you may need to repair or replace it. Follow these steps to guide you through the process:
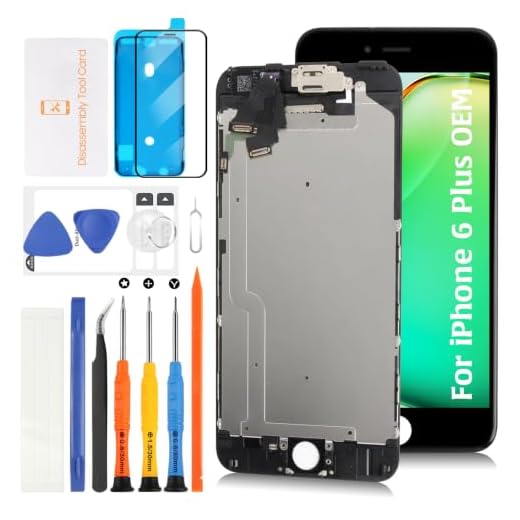


1. Start by gathering the necessary tools, including a small Phillips screwdriver, a spudger tool, and a replacement front camera module.
2. Power off your iPhone and remove the two screws located at the bottom of the device next to the charging port.
3. Use the spudger tool to carefully pry open the display assembly from the rear case. Be gentle to avoid damaging the cables.
4. Locate the front camera module at the top of the device and disconnect the cable attaching it to the logic board.
5. Remove the screws securing the front camera module in place and carefully lift it out of the device.
6. Install the replacement front camera module by following the steps in reverse order. Ensure all connections are secure before reassembling the device.
7. Power on your iPhone and test the front camera to ensure it is functioning properly.
By following these steps, you can successfully repair the front camera on your iPhone 6 Plus and restore its functionality.
Troubleshooting Front Camera Issues
If you are experiencing issues with the front camera on your iPhone 6 Plus, there are a few troubleshooting steps you can take to try and fix the problem. Here are some common solutions:
1. Restart Your Phone
Often, a simple restart can help resolve minor software glitches that may be affecting the front camera. Press and hold the power button until the “Slide to power off” slider appears, then slide to turn off your iPhone. Wait a few seconds, then press and hold the power button again to turn it back on.
2. Check for Updates
Make sure your iPhone’s software is up to date. Go to Settings > General > Software Update to check for any available updates. If there is an update available, download and install it to see if it resolves the front camera issue.
Disassembling iPhone 6 Plus
To fix the front camera on your iPhone 6 Plus, you may need to disassemble the device. Here are the steps to disassemble your iPhone 6 Plus:
Step 1: Gather the necessary tools
Before you start, make sure you have the right tools, including a pentalobe screwdriver, a suction cup, and a plastic spudger.
Step 2: Remove the screws
Use the pentalobe screwdriver to remove the two screws located next to the charging port on the bottom of the iPhone 6 Plus.
Continue disassembling the device by following the appropriate guides or tutorials to access the front camera module and make the necessary repairs.
Replacing Front Camera Module
If you are experiencing issues with your front camera on iPhone 6 Plus, you may need to replace the front camera module. Here is a step-by-step guide on how to do it:
Tools Required:
- Small Phillips screwdriver
- Plastic spudger tool
- Suction cup
- Tweezers
Step-by-Step Guide:
| 1. | Power off your iPhone 6 Plus. |
| 2. | Remove the two screws next to the lightning connector. |
| 3. | Use the suction cup to lift the display assembly. |
| 4. | Remove the screws securing the front panel assembly cable bracket. |
| 5. | Disconnect the front camera, earpiece speaker, and sensor cable connectors. |
| 6. | Remove the front camera module carefully. |
| 7. | Install the new front camera module and reassemble your iPhone 6 Plus following the steps in reverse order. |
By following these steps, you can replace the front camera module on your iPhone 6 Plus and restore its functionality.
Calibrating the New Camera
After replacing the front camera on your iPhone 6 Plus, it’s important to calibrate the new camera to ensure optimal performance. Follow these steps to calibrate the new camera:
1. Check Camera Settings
Make sure that the camera settings on your iPhone are properly configured. Go to Settings > Camera and check if the front camera is enabled and functioning correctly.
2. Test Camera Functionality
Open the camera app and test the front camera to see if it’s working properly. Take a few test photos and videos to check for any issues with focus or clarity.
Note: If you notice any issues with the camera’s performance, you may need to recalibrate the camera or seek professional help to diagnose and fix the problem.
Testing the Front Camera
Once you have completed the steps to fix the front camera on your iPhone 6 Plus, it’s essential to test it to ensure that the issue has been resolved. Here’s how you can test the front camera:
Step 1: Open Camera App
Launch the Camera app on your iPhone 6 Plus by tapping on the Camera icon on your home screen.
Step 2: Switch to Front Camera
Tap on the icon that looks like a camera with circular arrows to switch to the front camera. You should see yourself on the screen if the front camera is working correctly.
Reassembling the iPhone 6 Plus
Once you have successfully replaced the front camera on your iPhone 6 Plus, it’s time to reassemble the device. Follow these steps carefully:
Step 1: Carefully align the front panel to the top of the device and gently press it down to secure it in place.
Step 2: Insert the screws back into the bottom of the device using a screwdriver.
Step 3: Place the SIM card tray back into its slot on the side of the phone.
Step 4: Power on your iPhone 6 Plus and test the front camera to ensure it is functioning properly.
By following these steps, you should be able to successfully reassemble your iPhone 6 Plus after replacing the front camera.



Can you clarify the steps for reassembling the phone? I’m a bit confused about aligning the front panel.
What tools do I really need to fix the front camera? I’m worried about damaging something.
I found a small Phillips screwdriver and a spudger tool were the most essential. Just take it slow!
I had a similar issue with my iPhone 6 Plus. I followed most of the steps mentioned in the article, but when I got to the camera module, I couldn't get the cable disconnected. I ended up breaking the connector. It was such a hassle!