
 Carmen J. Moore

Are you a photography enthusiast who still loves the charm of film cameras but also wants to enjoy the convenience of digital photography? Digitizing your film camera can be the perfect solution for you. By converting your film negatives or slides into digital images, you can preserve your memories in a more accessible and shareable format. In this guide, we will walk you through the process of digitizing your film camera photos.
Step 1: Gather Your Equipment
Before you start digitizing your film camera photos, make sure you have all the necessary equipment. You will need a film scanner or a digital camera with a macro lens, a light table or a backlight, a clean microfiber cloth, and a computer with photo editing software.
Choose the Right Equipment
When it comes to digitizing film cameras, choosing the right equipment is crucial. You will need a good quality film scanner that is capable of capturing high-resolution images from your negatives or slides. Look for a scanner with a high optical resolution, at least 2400 dpi or higher, to ensure that you can capture all the details in your film.



Additionally, you may need a film holder or adapter that is compatible with your specific type of film. This will help you position the film correctly for scanning and ensure that it stays flat during the process. Some scanners come with built-in film holders, while others may require you to purchase them separately.
Consider investing in a color calibration tool to ensure that the colors in your digitized images are accurate. This will help you maintain the original look and feel of your film photos. Finally, make sure your computer has enough processing power and storage space to handle the large files produced by scanning film.
Prepare Your Film Camera
Before digitizing your film camera, make sure it is clean and in good working condition. Check the battery level and replace it if needed. Clean the lens and viewfinder to ensure clear images. Make sure the film is loaded correctly and there are no issues with the film advance mechanism.
It is also a good idea to set your camera to its highest resolution and quality settings to capture the best images possible. Familiarize yourself with the camera’s settings and controls to ensure you can adjust them as needed during the digitization process.
Set Up Lighting for Best Results
Proper lighting is crucial when digitizing film with a camera. Here are some tips to help you set up the lighting for the best results:
- Use diffused light sources to avoid harsh shadows and glare on the film.
- Position the lights at an angle to the film to minimize reflections.
- Avoid direct sunlight or bright overhead lights that can cause overexposure.
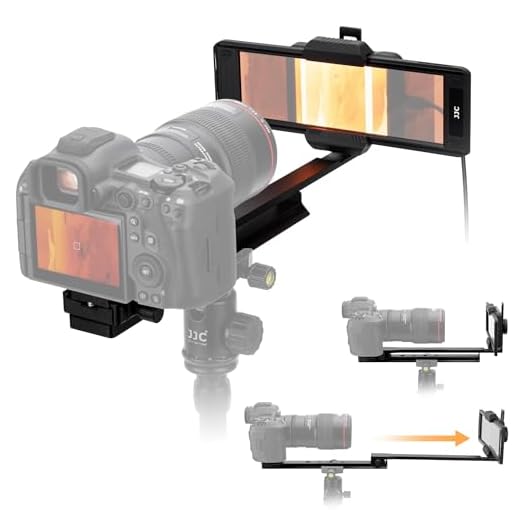
- Consider using a lightbox or light table to evenly illuminate the film.
By carefully setting up your lighting, you can ensure that your digitized images turn out clear and vibrant.
Adjust Camera Settings for Digitizing
Before you start digitizing your film camera photos, it’s important to adjust the settings on your digital camera to ensure the best results. Here are some key settings to consider:
1. Aperture and Shutter Speed
Set your camera to manual mode so you can control the aperture and shutter speed. Use a small aperture (high f-stop number) to maximize depth of field and ensure sharp focus. Adjust the shutter speed to avoid overexposure or underexposure.
2. White Balance and ISO
Adjust the white balance settings on your camera to match the lighting conditions of your digitizing setup. This will ensure accurate color reproduction. Set the ISO to the lowest value possible to minimize digital noise in your images.
Capture Images of Film Negatives
To digitize film camera, you can capture images of film negatives using a digital camera or a scanner. Here is a step-by-step guide to help you with the process:

Step 1: Prepare Your Equipment
Make sure you have a digital camera or a scanner that is capable of capturing high-quality images. Clean the film negatives to remove any dust or dirt that may affect the image quality.
Step 2: Set Up Your Workspace
Find a well-lit area with a flat surface to place your film negatives. Make sure the lighting is even to avoid shadows in your images.
| Equipment | Description |
|---|---|
| Digital Camera | Use a camera with a high resolution to capture clear images of the film negatives. |
| Scanner | If you are using a scanner, adjust the settings to scan the film negatives at a high resolution. |
Transfer Images to Computer
Once you have digitized your film camera images using a scanner or a digital camera, the next step is to transfer them to your computer for further editing and sharing. Here are the steps to transfer your images:
- Connect your scanner or digital camera to your computer using a USB cable or other appropriate connection.
- Turn on your scanner or digital camera and follow the device’s instructions to access the images you want to transfer.
- Select the images you want to transfer and copy them to a folder on your computer.
- Once the images are copied, you can open them in your preferred image editing software for further adjustments.
- Remember to properly organize and back up your digital images to prevent data loss.
Use Image Editing Software
Once you have digitized your film camera photos, you may want to enhance and edit them using image editing software. Software like Adobe Photoshop, Lightroom, or GIMP can help you adjust colors, contrast, brightness, and other aspects of your images. You can also remove dust and scratches, crop or resize your photos, and apply filters to give them a unique look.
Image editing software allows you to save your digitized photos in different formats and resolutions, making it easy to share them online or print them in high quality. Experiment with different editing tools and techniques to bring out the best in your film camera photos and create stunning digital images.

Save and Organize Digitized Images
Once you have digitized your film camera images, it is important to save and organize them properly to ensure easy access and long-term preservation.
- Create a dedicated folder on your computer or external hard drive to store all digitized images.
- Organize images into subfolders based on date, event, or subject to make it easier to locate specific photos.
- Consider using image editing software to enhance and edit digitized images for better quality.
- Backup your digitized images regularly to prevent data loss in case of computer failure or accidental deletion.
- Consider using cloud storage services for additional backup and easy access to your digitized images from any device.
Share Your Digitized Film Camera Images
Once you have digitized your film camera images, you may want to share them with others. Here are a few ways you can easily share your digitized film camera images:
- Upload them to social media platforms such as Instagram, Facebook, or Flickr.
- Create a digital photo album or gallery on websites like Google Photos or Imgur to share with friends and family.
- Print your digitized images and create physical copies to share with others.
Sharing your digitized film camera images allows you to preserve and showcase the beauty of film photography in the digital age.
FAQ
What is the process of digitizing a film camera?
The process of digitizing a film camera involves converting the analog images captured on film into digital format. This can be done using a film scanner or by photographing the film with a digital camera and then converting the images to digital files on a computer.
Can I digitize film camera photos at home?
Yes, you can digitize film camera photos at home using a film scanner or by using a digital camera to photograph the film negatives or slides. There are also services available that can digitize film camera photos for you if you prefer a professional touch.

What equipment do I need to digitize film camera photos?
To digitize film camera photos, you will need a film scanner, a digital camera with a macro lens, a computer with photo editing software, and possibly a light table or light box to help illuminate the film negatives or slides during the digitization process.
Is it better to digitize film camera photos yourself or use a professional service?
Whether you choose to digitize film camera photos yourself or use a professional service depends on your skills, time, and budget. If you have the necessary equipment and expertise, digitizing photos yourself can be cost-effective. However, a professional service may provide higher-quality results and save you time and effort.
What are the benefits of digitizing film camera photos?
Digitizing film camera photos allows you to preserve and share your analog images in a digital format, making them easier to view, edit, and share with others. It also helps protect them from damage or loss over time. Additionally, digitized photos can be easily printed, displayed on digital devices, or uploaded to online platforms for wider distribution.


Don't forget to back up your digitized images! I lost a bunch of memories because I didn't have a proper backup system in place.
Good article! What kind of film scanner do you recommend for beginners? I’m not looking to spend a lot, but I want decent quality.
I started with an inexpensive model from Epson, and it worked well for 35mm negatives. It's budget-friendly and user-friendly!
How do I know if my film scanner has a high enough optical resolution? Is 2400 dpi really the minimum for good results?
I recently tried digitizing my old film negatives using a digital camera and a light box. It took some time to set everything up, but the results were worth it! I used a macro lens, which really helped capture the details. Just be sure to clean the negatives thoroughly before shooting. The editing process was a bit overwhelming at first, but I found Lightroom pretty intuitive for adjustments.
That's great to hear! I'm thinking of doing the same, but I've read that lighting can be tricky. Did you have any issues with glare or shadows?
Lighting is indeed crucial. Using a light box helps achieve even illumination and reduces the risk of shadows or glare. Experimenting with angles can also help.
Is there any specific software you suggest for editing after digitizing? I'm not very experienced with photo editing.
For beginners, software like GIMP is a great free option, while Adobe Lightroom is user-friendly and powerful for photo editing. Both offer various tutorials to help get you started.
I disagree with the notion that only high-end scanners can do the job. I’ve used a budget scanner and got decent results after some editing. It all depends on the care you take during the process.
I recently digitized some old family photos using a DSLR and a light table. It took a bit of trial and error to get the lighting right, but the results were worth it! I found using diffused light sources really helped minimize glare. Just a heads-up though, if you have a lot of negatives, it can be time-consuming!
When you say to adjust the white balance, how do you know what to set it to? Is there a trick to getting it right?
A good approach is to take a test shot of a white piece of paper under the same lighting conditions. Adjust the white balance until the paper looks neutral in your image.
I agree with the need for proper lighting when digitizing. I learned the hard way that shadows can ruin a good scan. A light table is a must!
I disagree a bit on using a light table. I found that using a simple LED light source gives me more control over the shadows and reflections.
What kind of film scanner do you recommend for beginners? I want something that's not too pricey but still gets good quality images!
I started with a basic Canon scanner and it worked fine for my first few rolls. You might want to look at Epson models too—they're quite popular!
I recently tried digitizing some old family photos using a DSLR and a lightbox. It took a bit of trial and error, but I found that using a macro lens made a significant difference in capturing detail. I also had to adjust the white balance quite a bit to get the colors right. It was a rewarding experience, and the results came out great!
You mentioned using a macro lens; does that mean I need to buy a separate lens for my DSLR, or can I use my kit lens if it has a macro mode?
Could you clarify what you mean by a color calibration tool? Is it necessary for everyone?
I recently digitized my old film negatives, and it was quite an experience! I used a Canon camera with a macro lens and a lightbox. My first attempt had too much glare because I didn’t diffuse the light properly. After adjusting, the results were amazing! Totally worth the effort to preserve those memories.
I used a flatbed scanner once, and it didn't yield great results for film negatives. Definitely recommend a dedicated film scanner.
What type of film scanner do you recommend for beginners? I want something user-friendly and not too expensive.